I am off for the holiday weekend (4th of July here in the states). I am so ready to tackle some sewing projects that I have designed and planned in my head!!!
I washed two knit fabrics that I plan to combine to make a skirt and top that can be worn together or separately. I also plan to use two Love Notions patterns, The skirt pattern is the Sybil Illusion Skirt Collection, which style I plan to make is still under consideration. I have purchased a couple over the past couple of months and ready to give these new to me patterns a try.
One fabric I plan to use is a red rayon slub knit from Fabric Mart purchased in the fall of 2015. The other fabric I recently acquired was actually from JoAnn's. I saw this fabric on Deb's Stitches and Seams Blog. I have not yet taken pictures of recent fabric purchases. I have some new fabric from Cali Fabrics a new to me fabric store. I loved the look and the feel of this fabric when it arrived.
Holiday sewing has now began.
Showing posts with label Independent pattern makers. Show all posts
Friday, July 01, 2016
Sunday, May 29, 2016
Paulina Top
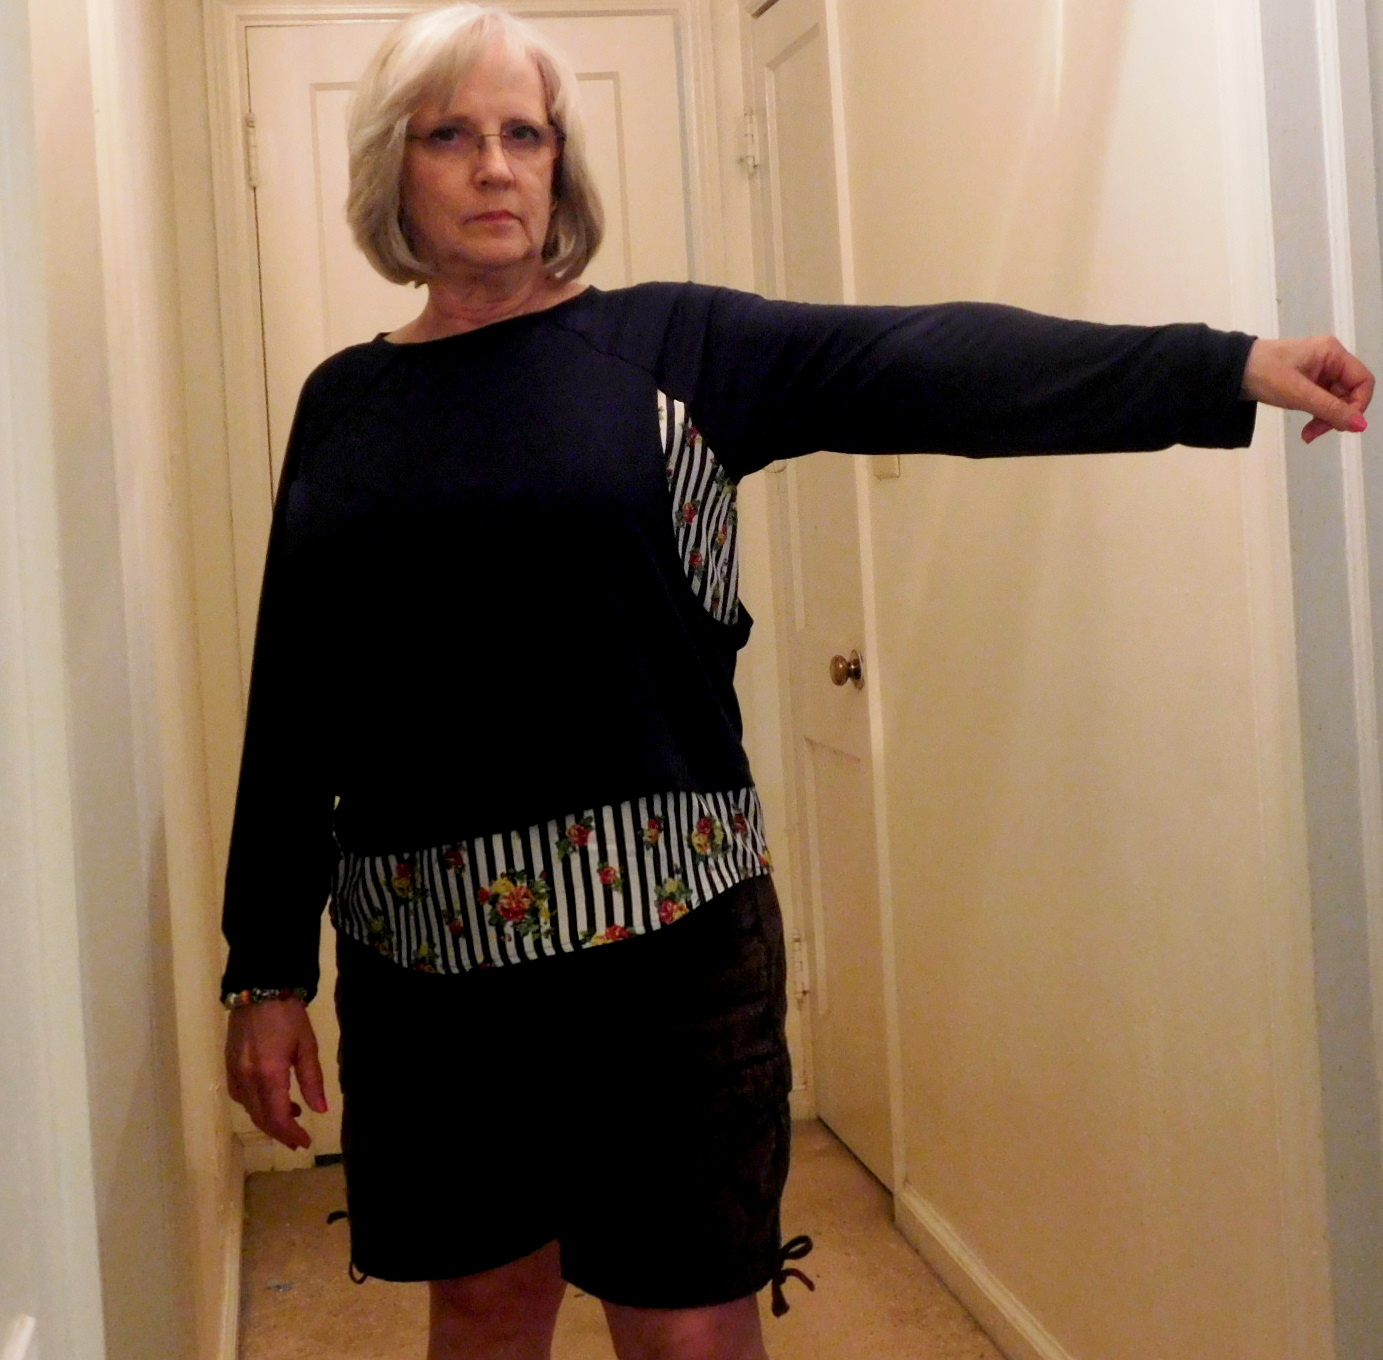
I completed the Paulina Top and I am pleased with the outcome!
This is PDF pattern that you print out. The nice thing about this pattern is that it uses layer printing so you only print the size(s) you need. For me with this pattern I printed the 10-12-14 sizes. Once I print and tape all the pieces together, I then trace the pattern pieces onto Swedish Tracing paper and then pin fit the pattern.
This time around I took the necessary time to determine the correct sizes I needed instead of just printing a size 14 and going for it. Results were not good.
I used a a size 10 for neckline and upper chest area, then graded to size 14 for bust to waist area, then back to 12 and using the shortest length. After pin fitting, I added an inch to the bust area in the front only using pivot and slide method. It was important to add the inch as the woven fabric underneath the cropped bodice needs to fit well. I used the added inch for the cropped bodice also and probably did not need to do so as the knit is more giving and I had to take a deeper side seam because of the fabric gaping. I still have some gaping and will remove this for future tops. I am going back on this one and take it in some more.
I made my usual swayback adjustment of 3/4 inch and added an inch to the neckline as this is a wide neckline, this is my personal preference. The sleeves are very long and the bicep area very full. I shortened the sleeves 2 inches and took a deeper seam than the 3/8 seam allowance. I also took in about 1/2 inch at the front and back neckline as I had some gaping there. The neckline is finished with bias band or bias tape. I decided to use bias tape in blue.
The fabrics used came from two sources, the navy blue knit is from Fabric Mart and the woven floral stripe is a rayon fabric from The Fabric Market. I love this fabric and considering buying more if still in stock. Lovely and easy to sew.
Here are some other views of the top. Excuse my faded look, I have had a viral infection that has stayed with me for about three weeks. I am on the mend but there is a horrible cough associated with this virus and I am prone to bronchitis so have coughed and coughed for days.
When I started the project before getting ill, we were still have cooler temps and I thought I could get some wear out of this before temps rose. I still might. Yesterday it was 80 degrees and this would have felt hot while outside.
This is PDF pattern that you print out. The nice thing about this pattern is that it uses layer printing so you only print the size(s) you need. For me with this pattern I printed the 10-12-14 sizes. Once I print and tape all the pieces together, I then trace the pattern pieces onto Swedish Tracing paper and then pin fit the pattern.
This time around I took the necessary time to determine the correct sizes I needed instead of just printing a size 14 and going for it. Results were not good.
I used a a size 10 for neckline and upper chest area, then graded to size 14 for bust to waist area, then back to 12 and using the shortest length. After pin fitting, I added an inch to the bust area in the front only using pivot and slide method. It was important to add the inch as the woven fabric underneath the cropped bodice needs to fit well. I used the added inch for the cropped bodice also and probably did not need to do so as the knit is more giving and I had to take a deeper side seam because of the fabric gaping. I still have some gaping and will remove this for future tops. I am going back on this one and take it in some more.
I made my usual swayback adjustment of 3/4 inch and added an inch to the neckline as this is a wide neckline, this is my personal preference. The sleeves are very long and the bicep area very full. I shortened the sleeves 2 inches and took a deeper seam than the 3/8 seam allowance. I also took in about 1/2 inch at the front and back neckline as I had some gaping there. The neckline is finished with bias band or bias tape. I decided to use bias tape in blue.
The fabrics used came from two sources, the navy blue knit is from Fabric Mart and the woven floral stripe is a rayon fabric from The Fabric Market. I love this fabric and considering buying more if still in stock. Lovely and easy to sew.
Here are some other views of the top. Excuse my faded look, I have had a viral infection that has stayed with me for about three weeks. I am on the mend but there is a horrible cough associated with this virus and I am prone to bronchitis so have coughed and coughed for days.
![]() |
| Sleeve fullness and cut out under the armhole |
![]() |
| Back view |
![]() |
| Front view |
![]() |
| Semi side view |
![]() |
| Woven underlay |
I can see another one of this for fall.
I am a Itch to Stitch Affiliate and wanted to give full disclosure about that. My review of the pattern is my personal experience with it. There is a link on the sidebar if you have an interest in purchasing this or any other Itch to Stitch pattern.
Sunday, May 22, 2016
Paulina Top
I started working on the Itch to Stitch Paulina Top yesterday.
I attempted this one once before and the outcome was not good. It was not the pattern it was me. One I chose the wrong size and never really tested it by pin fitting or making a muslin. I put it aside for awhile.
I like the look of this top for something casual and one thing that I need more of is tops for casual as well as for work. I have some tops that I have been wearing forever and the knit is started to peel or fade.
I decided to stick with blue fabrics since serger is threaded with blue thread and this fabric from
The Fabric Market has been calling out for my attention.
The blue knit fabric is from Fabric Mart.
This is where I left off yesterday morning with the blue knit overlay completed and then basted to neck and sleeve front.
The blue looks lighter in the picture above but it is truly a navy knit that has been in my stash or at least two years if not longer.
I have made a lot more progress since yesterday morning and will post more later.
Let me say I pin fitted the pattern last week and determined that I needed to sew a 10-12. I made some of my usual tweaks-swayback, raised neckline an inch, reduced the length of the sleeves as well as the width. I also made a one inch FBA using pivot and slide method.
More later.
I attempted this one once before and the outcome was not good. It was not the pattern it was me. One I chose the wrong size and never really tested it by pin fitting or making a muslin. I put it aside for awhile.
I like the look of this top for something casual and one thing that I need more of is tops for casual as well as for work. I have some tops that I have been wearing forever and the knit is started to peel or fade.
I decided to stick with blue fabrics since serger is threaded with blue thread and this fabric from
The Fabric Market has been calling out for my attention.
The blue knit fabric is from Fabric Mart.
This is where I left off yesterday morning with the blue knit overlay completed and then basted to neck and sleeve front.
The blue looks lighter in the picture above but it is truly a navy knit that has been in my stash or at least two years if not longer.
I have made a lot more progress since yesterday morning and will post more later.
Let me say I pin fitted the pattern last week and determined that I needed to sew a 10-12. I made some of my usual tweaks-swayback, raised neckline an inch, reduced the length of the sleeves as well as the width. I also made a one inch FBA using pivot and slide method.
More later.
Saturday, December 19, 2015
By Hand London
I began the pattern fitting process for By Hand London-Victoria Blazer. I am using a pink and black silk fabric that I have had in my stash for a number of years. You can see it in the photo below. This is from 2010.
The pattern has a large amount of ease as noted on the finished bust/waist and hip measurements. I cut a size 12 that may prove to be larger width wise than I want. Several reviewers indicated that the pattern runs large.
I will be using a black lining that also has been in my stash for sometime.
More updates later.
The pattern has a large amount of ease as noted on the finished bust/waist and hip measurements. I cut a size 12 that may prove to be larger width wise than I want. Several reviewers indicated that the pattern runs large.
I will be using a black lining that also has been in my stash for sometime.
More updates later.
Saturday, December 12, 2015
Jenna almost complete
I took a PTO day yesterday and after taking care of projects that needed to be done, I worked on the Jenna Cardi. Looking much better than the photo in my previous post.
There are lots of likes and some dislikes with this pattern. On top of that the knit I used is somewhat difficult to work with and not exactly what I think is best knit for this particular pattern.
I have completed everything except cuffs for sleeves and the buttonholes and buttons. I think I am going to use snaps as I think this knit may not take to buttonholes well. Will do a test run.
More updates and photos to follow.
There are lots of likes and some dislikes with this pattern. On top of that the knit I used is somewhat difficult to work with and not exactly what I think is best knit for this particular pattern.
I have completed everything except cuffs for sleeves and the buttonholes and buttons. I think I am going to use snaps as I think this knit may not take to buttonholes well. Will do a test run.
More updates and photos to follow.
Sunday, November 29, 2015
Next project is......
All pattern pieces were taped after printing. Now each pattern piece has been cut around and ready for tracing and then pin fitted.
Have not decided on the fabric yet. This will be my December garment of the month and will enter this into the Pattern Review contest for New to Me patterns.
Sunday, October 18, 2015
Presto Popover Top-take 2
I completed the Presto Popover top and had the opportunity to wear it yesterday. DH took some photos of me wearing after having worn the top for several hours.
This is my second version of this top. The first being a wadder; too many pattern adjustments made to the first to really mess up the fit. With this one, I kept the shoulders as drafted for the medium upper chest and shoulder size. I drafted a large for the remainder of the top. I also did a 3/4 inch swayback adjustment. There are still some fitting adjustments I need to make before I attempt this one again.
![]() |
| Back |
![]() |
| Front |
The reason for my hands being on my hips for the back photo view is because I really need for hip room in the back. It rides up while wearing as there is not enough width at the hip area to sit well especially over jeans. DH wanted me to hold the back piece down so the tell tale wrinkles did not show.
The front needs a little more bust room. I made a FBA and eliminated the resulting dart. I can see the wrinkles under the best pointing to the need for more room. I think I can do a vertical adjustment to correct this.
The collar was not as bothersome as I thought it might be. Once you turn the neckline into a shawl time collar it works well. I still think I will pleat out some of the width on the next one.
The knit used was a sweater knit/rayon fabric from Gorgeous Fabrics. It wears well but fiddly to sew. The sleeves are still a little tight for my liking and will adjust those more next time.
Monday, October 12, 2015
Columbus Day sewing
I was able to do some sewing this weekend and completed my second Presto Popover top. I posted about the first one which was more of a test than the actual planned top. Interestingly I ended up using another rayon knit fabric in blue acquired from Gorgeous Fabrics in 2014.
This version turned out much better than the previous one. I stuck with the pattern as is, meaning all adjustments I made previously with the shoulders, I did not do with this one allowing the yoke to fall in place as designed.
I still have a lot of fabric at the neckline and I had a ureka moment after I completed the top. The next version, and there will be, I will pleat out some of the fullness on the pattern before cutting out the fabric. The height of the collar in the back is just too much for my liking.
Sorry no photos of the finished top. Once I completed it, I had several other things on my holiday list to do.
I did wash some knit fabrics that I recently posted about, getting them ready for my next projects.
Back to work tomorrow! If you had the opportunity to have today as a holiday I hope it was a good one.
This version turned out much better than the previous one. I stuck with the pattern as is, meaning all adjustments I made previously with the shoulders, I did not do with this one allowing the yoke to fall in place as designed.
I still have a lot of fabric at the neckline and I had a ureka moment after I completed the top. The next version, and there will be, I will pleat out some of the fullness on the pattern before cutting out the fabric. The height of the collar in the back is just too much for my liking.
Sorry no photos of the finished top. Once I completed it, I had several other things on my holiday list to do.
I did wash some knit fabrics that I recently posted about, getting them ready for my next projects.
Back to work tomorrow! If you had the opportunity to have today as a holiday I hope it was a good one.
Saturday, October 10, 2015
Test Garment
I have been away since Wednesday attending a business conference in Greensboro, North Carolina. Returning yesterday after unpacking I decided to spend a little time in my sewing room. I basted the side seams for the Presto Popover Top. That was the last step in the process to determine the fit.
I took some photos and made some notes on the fitting areas for the neckline. I used a medium size for the neck and shoulders and upper chest. I then blended to a large about an inch from the underarm to the bottom of the top. An earlier post I showed you the full bust adjustment I made. The issue is the back collar. There seems to be just too much fabric for the back neckline for me. Or perhaps the center neckline seam needs to be taken up. Perhaps I need to trace the small for the neckline and use the medium for the shoulder and upper chest.
One of the fitting issues in sewing the test garment, I had to re-do the back attachment to the front piece and in doing so I ended up cutting about 3/8 of the yoke seam which I knew would impact some of the fit. This is also a very thin burnout knit and most likely the recovery in re-stitching the front to the back twice impacted the look of the neckline in the front as well as the back.
I really appreciate and want your constructive feedback about what you see from the pictures below. Are you seeing what I'm describing or something else? Let me also say I made a forward shoulder adjustment which may not be appropriate for this pattern. I can see from the photos as well as in person that the shoulder area moves forward. Again I'm not sure that this is an appropriate adjustment for this pattern. I've looked at several reviews of this pattern on Pattern Review and it's hard to tell where the back yoke needs to fall.
Thanks again for reviewing and your feedback.
I took some photos and made some notes on the fitting areas for the neckline. I used a medium size for the neck and shoulders and upper chest. I then blended to a large about an inch from the underarm to the bottom of the top. An earlier post I showed you the full bust adjustment I made. The issue is the back collar. There seems to be just too much fabric for the back neckline for me. Or perhaps the center neckline seam needs to be taken up. Perhaps I need to trace the small for the neckline and use the medium for the shoulder and upper chest.
One of the fitting issues in sewing the test garment, I had to re-do the back attachment to the front piece and in doing so I ended up cutting about 3/8 of the yoke seam which I knew would impact some of the fit. This is also a very thin burnout knit and most likely the recovery in re-stitching the front to the back twice impacted the look of the neckline in the front as well as the back.
I really appreciate and want your constructive feedback about what you see from the pictures below. Are you seeing what I'm describing or something else? Let me also say I made a forward shoulder adjustment which may not be appropriate for this pattern. I can see from the photos as well as in person that the shoulder area moves forward. Again I'm not sure that this is an appropriate adjustment for this pattern. I've looked at several reviews of this pattern on Pattern Review and it's hard to tell where the back yoke needs to fall.
Thanks again for reviewing and your feedback.
Sunday, October 04, 2015
Presto Popover Top
I have been working on the Presto Popover Top this weekend. I printed this pattern several days ago and Friday evening I taped all of the pages together. I then traced around the medium and large sizes that seem to fit my measurements. I then pin fitted the traced pattern and decided I needed to make a small FBA.
My first attempt at the FBA was to use my usual method which results in a bust dart. I then decided to eliminate the bust dart and take off the extra from the side that was created. However something went wrong in this process and the side seams did not match up. I really did not want a bust dart. I decided to try another method using fitting book by Sandra Betzina.
If you click on the photo you will be able to see how this method works to create a FBA. Here's what the front pattern piece looks like using this method.
I decided to use another fabric to test so this pattern. This is a piece that is from my stash that's a burnout rayon knit that I purchased from JoAnn's Fabrics. I made some adjustments to the shoulder as well as a sway back adjustment. Because of these adjustments I decided that it was best to test the pattern. From reading reviews at PR, I know that there is a tricky part with the neckline and attaching it to the back. And of course it took me three tries to finally get it correct. In doing so my cheapo fabric stretched out a shape somewhat. I am happy that I have figured out how to do this so when using other fabrics I should not have this issue.
I still need to attach the sleeves and during the pin fitting process I determined that I had traced the wrong size and had to trace another sleeve pattern. It does seeing from the reviews that the sleeve may be tight so I adjusted for that as well. Once you sew in the sleeves flat you then sew up the side seams and hem. Then presto! you have a completed top.
Here's a picture of the fabric that I'm using; it's hard to see the burnout areas and the knit is very thin. However it has served its purpose as a test for this pattern.
My first attempt at the FBA was to use my usual method which results in a bust dart. I then decided to eliminate the bust dart and take off the extra from the side that was created. However something went wrong in this process and the side seams did not match up. I really did not want a bust dart. I decided to try another method using fitting book by Sandra Betzina.
If you click on the photo you will be able to see how this method works to create a FBA. Here's what the front pattern piece looks like using this method.
I decided to use another fabric to test so this pattern. This is a piece that is from my stash that's a burnout rayon knit that I purchased from JoAnn's Fabrics. I made some adjustments to the shoulder as well as a sway back adjustment. Because of these adjustments I decided that it was best to test the pattern. From reading reviews at PR, I know that there is a tricky part with the neckline and attaching it to the back. And of course it took me three tries to finally get it correct. In doing so my cheapo fabric stretched out a shape somewhat. I am happy that I have figured out how to do this so when using other fabrics I should not have this issue.
I still need to attach the sleeves and during the pin fitting process I determined that I had traced the wrong size and had to trace another sleeve pattern. It does seeing from the reviews that the sleeve may be tight so I adjusted for that as well. Once you sew in the sleeves flat you then sew up the side seams and hem. Then presto! you have a completed top.
Here's a picture of the fabric that I'm using; it's hard to see the burnout areas and the knit is very thin. However it has served its purpose as a test for this pattern.
Sunday, September 27, 2015
Quick View
I completed the Butterick 6183 top. I am okay with the blouse.I have a few dislikes and some are my issues and not the pattern. I was so focused on fitting the bust,the back, the waist, the hips that I did not focus on the shoulder and where the shoulder ended.
I don't like the insertion of the zipper as they have you do it. Next time, I will insert the zipper on the side, or adjust the back opening to a full seam and insert the zipper there .
Here are a few photos of the completed blouse.
My next project will be the Presto Top by Savage Coco. I have a red rayon slub knit that I just washed to be used for this top. This was just recently acquired from Fabric Mart. More posting and photos to follow
I don't like the insertion of the zipper as they have you do it. Next time, I will insert the zipper on the side, or adjust the back opening to a full seam and insert the zipper there .
Here are a few photos of the completed blouse.
My next project will be the Presto Top by Savage Coco. I have a red rayon slub knit that I just washed to be used for this top. This was just recently acquired from Fabric Mart. More posting and photos to follow
Saturday, September 05, 2015
Itch to Quit
I have gone as far as I am going to go with the Paulina Top by Itch to Stitch. I am disappointed with the outcome of the mostly completed garment. Let me say that the pattern is a good pattern and I will make it again using a different size as well as different fabric.
Just a few quick comments about the issues with this pattern that we more mine than the pattern. I am so use to the Big Four patterns and using a size range from 14-18 that I did not do a more thorough review of the sizing and finished size measurements with this indie pattern, Instead I somewhat blindly went with a 12/14. This proved to be very, very large on me. Shame on me for not clearly paying attention to the finished measurements for this pattern. I also did not go by upper bust measurement as that would have produced a better fit all around.
With 20/20 hindsight and a closer look of the top on the model, I should have paid more attention to how low and wide the neckline would be. Again this is operator error and not the pattern; it was drafted just as it is shown. With aging decollete and neck, this low top seems to draw attention to that area and I don't want that attention there; it not so flattering. There are other fitting adjustments that I did not do and I think that going with a smaller size will address some of those.
The fabric was a pain to deal with also. Too fiddly.
I completed the top except for the hems of the bodice and sleeve. I decided to stop at that point as I will not wear this except as a top to wear around the house.
I am now on to my next project and with a long holiday weekend I hope to accomplish a good headway with the new project. I just need to determine what that project will be. Several ideas and fabrics, just need to decide. It will be for fall.
More later and I will take some photos of the top worn. Sometimes you need to show the good, the bad and the ugly.
Just a few quick comments about the issues with this pattern that we more mine than the pattern. I am so use to the Big Four patterns and using a size range from 14-18 that I did not do a more thorough review of the sizing and finished size measurements with this indie pattern, Instead I somewhat blindly went with a 12/14. This proved to be very, very large on me. Shame on me for not clearly paying attention to the finished measurements for this pattern. I also did not go by upper bust measurement as that would have produced a better fit all around.
With 20/20 hindsight and a closer look of the top on the model, I should have paid more attention to how low and wide the neckline would be. Again this is operator error and not the pattern; it was drafted just as it is shown. With aging decollete and neck, this low top seems to draw attention to that area and I don't want that attention there; it not so flattering. There are other fitting adjustments that I did not do and I think that going with a smaller size will address some of those.
The fabric was a pain to deal with also. Too fiddly.
I completed the top except for the hems of the bodice and sleeve. I decided to stop at that point as I will not wear this except as a top to wear around the house.
I am now on to my next project and with a long holiday weekend I hope to accomplish a good headway with the new project. I just need to determine what that project will be. Several ideas and fabrics, just need to decide. It will be for fall.
More later and I will take some photos of the top worn. Sometimes you need to show the good, the bad and the ugly.
Sunday, August 23, 2015
Next project-Itch to Stitch
I have acquired several independent patterns for the past couple of years and have made up a few. My most recent was the Kirsten Kimono Top and made two of those with good success.
I am now working on another indie pattern, the Paulina Top from Itch to Stitch.
I have prepared fabric I purchased from Vogue Fabrics early this year for this top, washing and drying it last night.
The black, gray, red and white fabric is a knit lace fabric and I wanted that to be the underlying fabric, yet the lace is very open and will not work for me as that underlying fabric. So I will make it the top fabric and the red will show through.
I printed the pattern pieces. The one thing I truly like about this pattern is that it contains layers which allow you to print only the size(s) you need instead of all the sizes making it more cumbersome to trace your size. I printed only the 12/14 sizes. All the taping was put together last night and tracing was started and now completed.
I pin fitted the traced pattern pieces and determined that I only need to make a swayback adjustment for the bodice pieces. The sleeves with this pattern are very full. I don't care for all of that fullness. If you look at the above photo of the top, the sleeves on the model are very full looking also. I took out 1.25 inches from the width of the sleeves from under arm to hem. I also reduced the length by 1.5 inches.
Off to cut out the fabric, set up machines and sew. More information to follow.
I am now working on another indie pattern, the Paulina Top from Itch to Stitch.
I have prepared fabric I purchased from Vogue Fabrics early this year for this top, washing and drying it last night.
The black, gray, red and white fabric is a knit lace fabric and I wanted that to be the underlying fabric, yet the lace is very open and will not work for me as that underlying fabric. So I will make it the top fabric and the red will show through.
I printed the pattern pieces. The one thing I truly like about this pattern is that it contains layers which allow you to print only the size(s) you need instead of all the sizes making it more cumbersome to trace your size. I printed only the 12/14 sizes. All the taping was put together last night and tracing was started and now completed.
I pin fitted the traced pattern pieces and determined that I only need to make a swayback adjustment for the bodice pieces. The sleeves with this pattern are very full. I don't care for all of that fullness. If you look at the above photo of the top, the sleeves on the model are very full looking also. I took out 1.25 inches from the width of the sleeves from under arm to hem. I also reduced the length by 1.5 inches.
Off to cut out the fabric, set up machines and sew. More information to follow.
Wednesday, July 15, 2015
Wearing the new top
In reading through the PR Digest the other morning I read another review for the Kirsten Kimono Tee. This reviewer had taken a deeper seam at the waist area to give the top a little more shape. She also curved the hemline-nice design idea for me to try later. I decided I wanted to take a deeper seam at the waist line also.
After coming home from dinner with DH after work, I decided to sew the deeper waist seam and here are photos of me wearing the top. My after work face look was not presentable for photos so I intentionally cropped off most of my head in the photos. Besides I wanted to show off the top!
I plan to make one more of this top for my upcoming beach trip.
After coming home from dinner with DH after work, I decided to sew the deeper waist seam and here are photos of me wearing the top. My after work face look was not presentable for photos so I intentionally cropped off most of my head in the photos. Besides I wanted to show off the top!
![]() |
| semi-side view |
![]() |
| Back view with pajama bottoms picking out |
![]() |
| Front view |
Sunday, July 12, 2015
Kirsten Kimono Tee
I completed the Kirsten Kimono Tee. I must be one of the last people to sew this top. It is super easy to sew. I had to determine the best size for me. I have found that some independent patterns draft quite different from the Big 4.
I used size Large for this top. I traced the pattern size after printing and taping the printed pages together. I then pin fitted the traced pattern and determined fitting issues.
I ended up making a 1 1/2 inch FBA; making a sway back adjustment of 1 inch; increased the back hip area by 1 inch by drawing a straight line about 1 1/2 inches from the side seam up to the waist area, and cutting a hinge at the waist area to the straight line and then I cut the line up to that area, inserted an inch of paper to increase that area tapering to nothing at hinge and trued the side seam. This is method I learned from taking "Lynda Maynard's Fitting Class" on Craftsy.
I eliminated the bust dart that was created when making the FBA and removed fullness from the side seam. I also traced the pattern length to the small length size and ended up removing another inch after basting the side seams for fitting.
The fabric was from Mood. When I purchased the fabric I was surprised by the colors when it arrived. The quality of the knit was good but the colors did not match up with my computer monitor. Recently I have seen the fabric sewn by Deepika at Pattern Review and decided that I like the overall look once sewn.
Decided to use this fabric as my original plan was to use a striped fabric but I did not have enough of it to make this top.
Without further ado-
The tee can be made with a neckband attached or using fold over elastic. I cut out a 2.5 inch strip of fabric and attached using 1/2 inch seam. Before attaching the neckband I tried the top on and decided it was lower than I wanted and a narrower neckband would not raise the neckline enough for my preference. This proved to be the perfect size to use.
I used size Large for this top. I traced the pattern size after printing and taping the printed pages together. I then pin fitted the traced pattern and determined fitting issues.
I ended up making a 1 1/2 inch FBA; making a sway back adjustment of 1 inch; increased the back hip area by 1 inch by drawing a straight line about 1 1/2 inches from the side seam up to the waist area, and cutting a hinge at the waist area to the straight line and then I cut the line up to that area, inserted an inch of paper to increase that area tapering to nothing at hinge and trued the side seam. This is method I learned from taking "Lynda Maynard's Fitting Class" on Craftsy.
I eliminated the bust dart that was created when making the FBA and removed fullness from the side seam. I also traced the pattern length to the small length size and ended up removing another inch after basting the side seams for fitting.
The fabric was from Mood. When I purchased the fabric I was surprised by the colors when it arrived. The quality of the knit was good but the colors did not match up with my computer monitor. Recently I have seen the fabric sewn by Deepika at Pattern Review and decided that I like the overall look once sewn.
Decided to use this fabric as my original plan was to use a striped fabric but I did not have enough of it to make this top.
Without further ado-
![]() |
| Kirsten Kimono Tee-Front |
![]() |
| Back view |
![]() |
| Neckband closeup |
Photos of my wearing will follow soon. I plan to make another top as part of my upcoming beach vacation. This is a truly easy top to sew once you get the right fit.
Friday, January 02, 2015
I won a pattern!
I have been a member of Pattern Review for years. Recently I have been reading posts there more frequently and participating in some discussions. I receive a daily digest and enjoy reading through that early AM before getting ready for work or play.
Recently there was an article about Janet Pray, owner of Islander Sewing System. I found it most interesting and learned more about her background. Commenting on the blog post entered you in the opportunity to win a pattern, and I WON!!! I recently signed up to take her class on Craftsy.
I am so happy about this pattern as it is another version of a moto-jacket. I think I have the perfect fabric for this one.
Recently there was an article about Janet Pray, owner of Islander Sewing System. I found it most interesting and learned more about her background. Commenting on the blog post entered you in the opportunity to win a pattern, and I WON!!! I recently signed up to take her class on Craftsy.
I am so happy about this pattern as it is another version of a moto-jacket. I think I have the perfect fabric for this one.
Off to the sewing room!
Tuesday, August 19, 2014
Tribeca Top in the Works
I normally do not sew a muslin. Most of the time I use a pin and fit method as described in the book "Fit for Real People". Perhaps instinct kicked in for this particular top and I decided to test the fit using similar knit fabric that I want to use when making the real garment. I am glad I decided to do that.
I used a knit that has been in my stash for awhile and was left over from another project that did not go so well. I traced the sizes I used for the Penny Pinafore dress pattern. I then cut out the test knit fabric and quickly serged the top. There were a few fitting concerns.
1. The sleeves were too long for a cap sleeve on me; I failed to shorten the sleeve in the shoulder area. I pinned that out on the test garment and made the fit better.
2. I took a horizontal tuck in the upper chest and upper back to go with the shortened sleeve.
3. I made my usual sway back adjustment with the pattern before cutting out the fabric and found I still needed to take out another 3/8 of an inch in the back area above the waist.
4. The bust area was a little snug and decided to make a FBA of 1 inch.
5. I also made an adjustment at the hip using a fitting adjustment from a Craftsy video produced by Lynda Maynard. This was about an inch adjustment.
After making these adjustments on the pattern pieces, I had enough fabric left to cut out a new bodice front and back. I cut the sleeves from another solid knit fabric. The neckband that I cut previously will still work with this test Tribeca Top. Hopefully I can test the fit of that tomorrow.
I used a knit that has been in my stash for awhile and was left over from another project that did not go so well. I traced the sizes I used for the Penny Pinafore dress pattern. I then cut out the test knit fabric and quickly serged the top. There were a few fitting concerns.
1. The sleeves were too long for a cap sleeve on me; I failed to shorten the sleeve in the shoulder area. I pinned that out on the test garment and made the fit better.
2. I took a horizontal tuck in the upper chest and upper back to go with the shortened sleeve.
3. I made my usual sway back adjustment with the pattern before cutting out the fabric and found I still needed to take out another 3/8 of an inch in the back area above the waist.
4. The bust area was a little snug and decided to make a FBA of 1 inch.
5. I also made an adjustment at the hip using a fitting adjustment from a Craftsy video produced by Lynda Maynard. This was about an inch adjustment.
After making these adjustments on the pattern pieces, I had enough fabric left to cut out a new bodice front and back. I cut the sleeves from another solid knit fabric. The neckband that I cut previously will still work with this test Tribeca Top. Hopefully I can test the fit of that tomorrow.
Sunday, August 17, 2014
Sewing at Casa la Danvillegirl
Limited sewing took place this past week. There were more starts and stops with little bits completed.
The black ponte knit from Mood fabrics was the perfect rich black color I wanted; the weight or hand of the fabric is somewhat softer/thinner. I don't think it will work with the black and brown fabric. I am going to try to apply a knit interfacing to a square of the fabric to see if this may give it the hand I'm wanting.
Meanwhile I completed the taping of numerous pattern pages for the Tribeca Top. This is an independent pattern from Kitschy Coo. The Penny Pinafore dress pattern was a great fit particularly in the upper bust/chest area. I have now traced and cut out the pattern pieces for my size and will test this with another solid knit fabric from my stash. Hopefully this will fit as well as the other pattern did.
I hope your sewing is going well and will post more later.
The black ponte knit from Mood fabrics was the perfect rich black color I wanted; the weight or hand of the fabric is somewhat softer/thinner. I don't think it will work with the black and brown fabric. I am going to try to apply a knit interfacing to a square of the fabric to see if this may give it the hand I'm wanting.
Meanwhile I completed the taping of numerous pattern pages for the Tribeca Top. This is an independent pattern from Kitschy Coo. The Penny Pinafore dress pattern was a great fit particularly in the upper bust/chest area. I have now traced and cut out the pattern pieces for my size and will test this with another solid knit fabric from my stash. Hopefully this will fit as well as the other pattern did.
I hope your sewing is going well and will post more later.
Wednesday, July 16, 2014
What I wore-Penny Pinafore by Kitschy Coo
I completed the dress this weekend and wore it yesterday to work.
I really like this dress pattern and the way it falls from shoulder down. I did feel like that by the end of the day the dress expanded from waist down. I had thought about taking a deeper side seam at the waist. This is a wash and wear fabric; I did wash and dry before sewing. Sometimes fabric still shrinks so I will test the need for taking deeper waist to hem side seams.
The fabric did not wrinkle much and in spite of the warmer temperatures I felt comfortable in the dress and with longer sleeves and cool A/C in my office, the longer sleeves felt good. I had to travel in the dress yesterday, so driving and getting in and out of the car, again the wrinkles were minimal.
I do see another dress from this pattern for the future.
![]() |
| Back view |
![]() |
| Front view |
![]() | |
| Semi side view |
The fabric did not wrinkle much and in spite of the warmer temperatures I felt comfortable in the dress and with longer sleeves and cool A/C in my office, the longer sleeves felt good. I had to travel in the dress yesterday, so driving and getting in and out of the car, again the wrinkles were minimal.
I do see another dress from this pattern for the future.
Sunday, July 06, 2014
Almost complete
I am making great progress on the dress and I am so pleased with the fit. I had some tweaks to make while sewing. The weight of the knit fabrics pulled the shoulders and neckline down. I ended up taking in the shoulder seams by one inch. I cut 3/4 inch off the top of the sleeve and it fit perfectly. I did test it before cutting off the excess fabric.
I cut the neckband about 3/8 wider than called for so I could stitch a 1/2 seam to attach the neckband. I like having a little extra width as it makes sewing and handling better.
The sleeves call for a band at the hemline and I cut out the stripe/floral fabric for that band. I still need to attach the bands and hem the dress. The length is a little long but I am thinking about keeping it that length and having a midi length dress. I am still thinking on that.
I needed to take a deeper seam at the back/side back area at the waist line to take out a smidgen of fullness.
Here is shot of the dress hanging as it is now.
More later!
I cut the neckband about 3/8 wider than called for so I could stitch a 1/2 seam to attach the neckband. I like having a little extra width as it makes sewing and handling better.
The sleeves call for a band at the hemline and I cut out the stripe/floral fabric for that band. I still need to attach the bands and hem the dress. The length is a little long but I am thinking about keeping it that length and having a midi length dress. I am still thinking on that.
I needed to take a deeper seam at the back/side back area at the waist line to take out a smidgen of fullness.
Here is shot of the dress hanging as it is now.
![]() |
| front view |
![]() |
| back view |
Subscribe to:
Posts (Atom)
August Sewing Simplicity 7295
I am not doing well as a blogger. I have been working on this project since July 30. Today, I finally finished it. It has been a stop-and-g...
-
I am not doing well as a blogger. I have been working on this project since July 30. Today, I finally finished it. It has been a stop-and-g...
-
Recent sewing projects I've completed have been challenging. It is the first time in probably months that I started a dress pattern a...