Showing posts with label Itch to Stitch. Show all posts

Sunday, May 29, 2016

Paulina Top

I completed the Paulina Top and I am pleased with the outcome!

This is PDF pattern that you print out.  The nice thing about this pattern is that it uses layer printing so you only print the size(s) you need.  For me with this pattern I printed the 10-12-14 sizes.  Once I print and tape all the pieces together, I then trace the pattern pieces onto Swedish Tracing paper and then pin fit the pattern.

This time around I took the necessary time to determine the correct sizes I needed instead of just printing a size 14 and going for it.  Results were not good.

I used a a size 10 for neckline and upper chest area, then graded to size 14 for bust to waist area, then back to 12 and using the shortest length.  After pin fitting, I added an inch to the bust area in the front only using pivot and slide method.  It was important to add the inch as the woven fabric underneath the cropped bodice needs to fit well.  I used the added inch for the cropped bodice also and probably did not need to do so as the knit is more giving and I had to take a deeper side seam because of the fabric gaping.  I still have some gaping and will remove this for future tops.  I am going back on this one and take it in some more.

I made my usual swayback adjustment of 3/4 inch and added an inch to the neckline as this is a wide neckline, this is my personal preference.  The sleeves are very long and the bicep area very full.  I shortened the sleeves 2 inches and took a deeper seam than the 3/8 seam allowance.  I also took in about 1/2 inch at the front and back neckline as I had some gaping there.  The neckline is finished with bias band or bias tape.  I decided to use bias tape in blue.

The fabrics used came from two sources, the navy blue knit is from Fabric Mart and the woven floral stripe is a rayon fabric from The Fabric Market.  I love this fabric and considering buying more if still in stock.  Lovely and easy to sew.

Here are some other views of the top.  Excuse my faded look, I have had a viral infection that has stayed with me for about three weeks.  I am on the mend but there is a horrible cough associated with this virus and I am prone to bronchitis so have coughed and coughed for days.
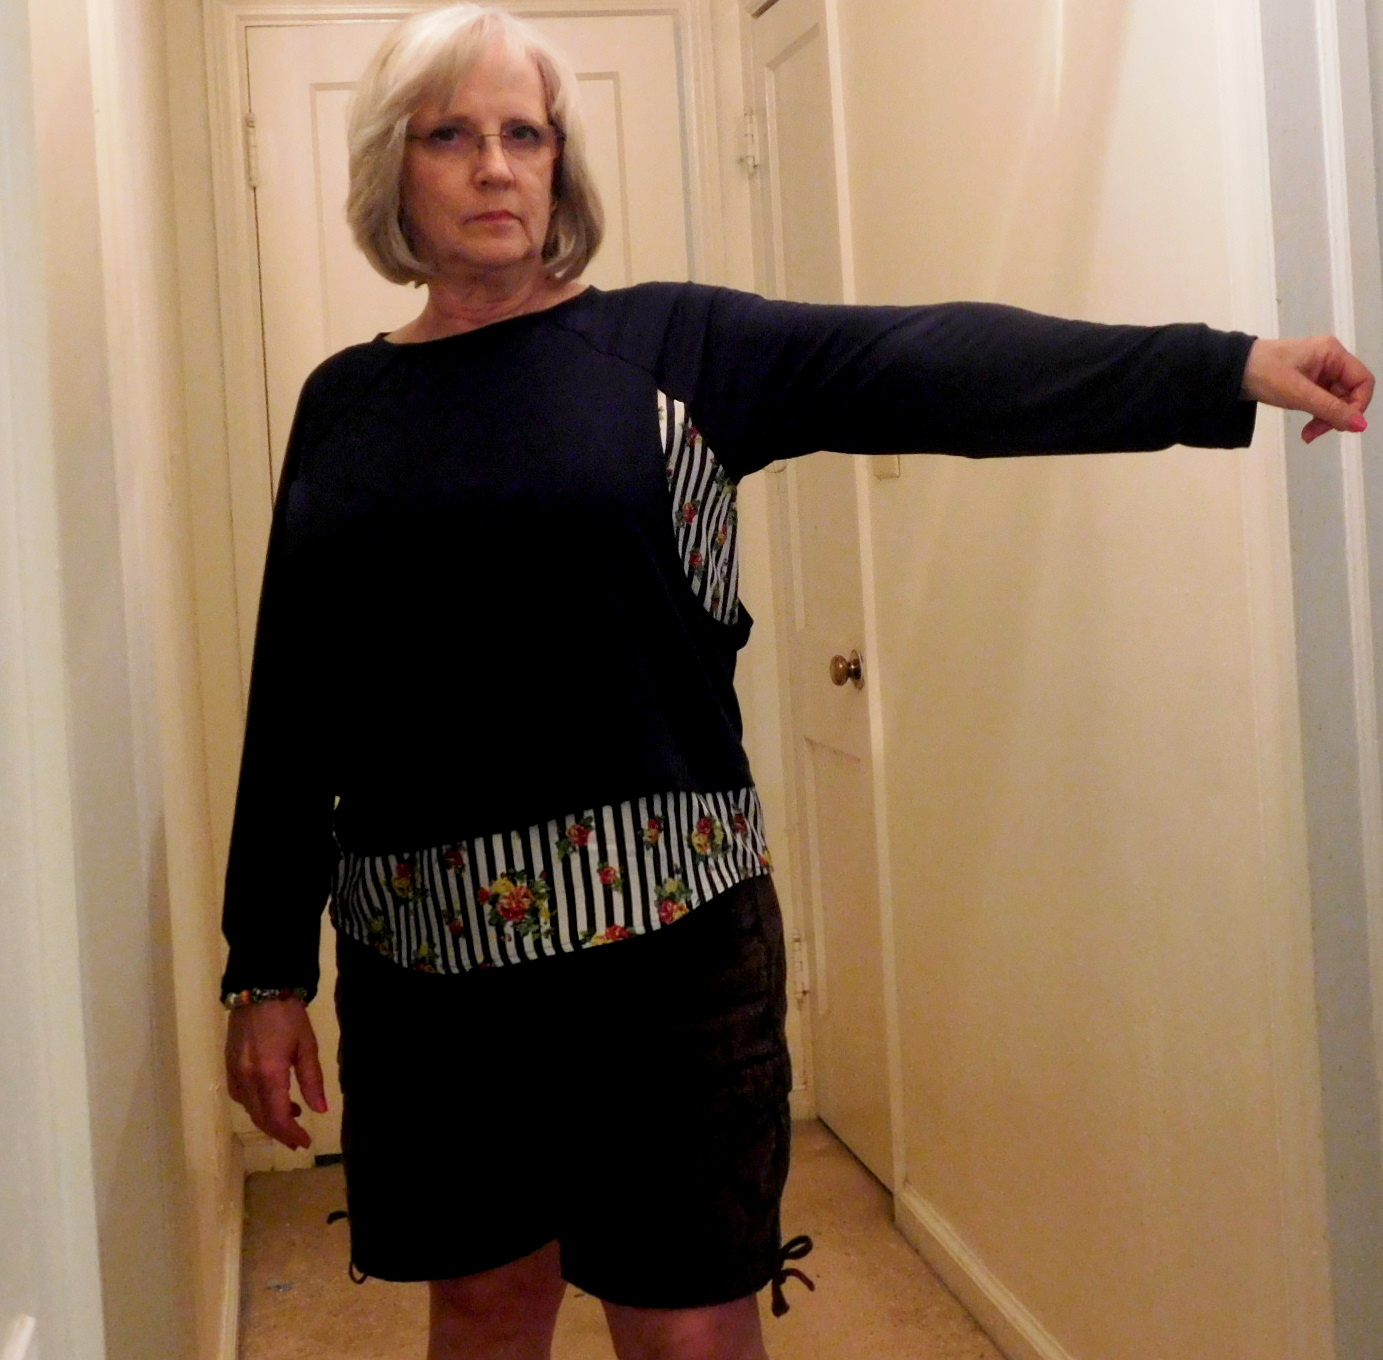
Sleeve fullness and cut out under the armhole

Back view

Front view

Semi side view

Woven underlay


When I started the project before getting ill, we were still have cooler temps and I thought I could get some wear out of this before temps rose.  I still might.  Yesterday it was 80 degrees and this would have felt hot while outside.  

I can see another one of this for fall.  

I am a Itch to Stitch Affiliate and wanted to give full disclosure about that.  My review of the pattern is my personal experience with it.  There is a link on the sidebar if you have an interest in purchasing this or any other Itch to Stitch pattern.


Sunday, May 22, 2016

Paulina Top

I started working on the Itch to Stitch Paulina Top yesterday.
I attempted this one once before and the outcome was not good.  It was not the pattern it was me.  One I chose the wrong size and never really tested it by pin fitting or making a muslin.  I put it aside for awhile.

 I like the look of this top for something casual and one thing that I need more of is tops for casual as well as for work.  I have some tops that I have been wearing forever and the knit is started to peel or fade. 

I decided to stick with blue fabrics since serger is threaded with blue thread and this fabric from
The Fabric Market has been calling out for my attention.

The blue knit fabric is from Fabric Mart.
This is where I left off yesterday morning with the blue knit overlay completed and then basted to neck and sleeve front.
The blue looks lighter in the picture above but it is truly a navy knit that has been in my stash or at least two years if not longer.

I have made a lot more progress since yesterday morning and will post more later.

Let me say I pin fitted the pattern last week and determined that I needed to sew a 10-12.  I made some of my usual tweaks-swayback, raised neckline an inch, reduced the length of the sleeves as well as the width.  I also made a one inch FBA using pivot and slide method.

More later.


Saturday, September 05, 2015

Itch to Quit

I have gone as far as I am going to go with the Paulina Top by Itch to Stitch.  I am disappointed with the outcome of the mostly completed garment.  Let me say that the pattern is a good pattern and I will make it again using a different size as well as different fabric.

Just a few quick comments about the issues with this pattern that we more mine than the pattern.  I am so use to the Big Four patterns and using a size range from 14-18 that I did not do a more thorough review of the sizing and finished size measurements with this indie pattern,  Instead I somewhat blindly went with a 12/14.  This proved to be very, very large on me.  Shame on me for not clearly paying attention to the finished measurements for this pattern. I also did not go by upper bust measurement as that would have produced a better fit all around.

With 20/20 hindsight and a closer look of the top on the model, I should have paid more attention to how low and wide the neckline would be.  Again this is operator error and not the pattern; it was drafted just as it is shown.  With aging decollete and neck, this low top seems to draw attention to that area and I don't want that attention there; it not so flattering.  There are other fitting adjustments that I did not do and I think that going with a smaller size will address some of those.

The fabric was a pain to deal with also.  Too fiddly.

I completed the top except for the hems of the bodice and sleeve.  I decided to stop at that point as I will not wear this except as a top to wear around the house.

I am now on to my next project and with a long holiday weekend I hope to accomplish a good headway with the new project.  I just need to determine what that project will be.  Several ideas and fabrics, just need to decide. It will be for fall.

More later and I will take some photos of the top worn.  Sometimes you need to show the good, the bad and the ugly.


Saturday, August 29, 2015

Some Sewing

I had some time this afternoon to do a little sewing.  I did not actually sew anything together yet.  I needed to get my serger set to use on the two fabrics for the Paulina Top.  

The red solid fabric is a rayon knit and rather lightweight.  I had a hard time getting the differential and stitch tension correct.  I am not totally happy with how it is set now; it will do.

The lace knit has a very open weave to it.
I tested the use of the serger for edge finishing and decided that I did not like how that looked.  I decided to use fusible bias tape. I think that this secures the edges.
Next step is to attach the front and back of the lace fabric at the side seams.  I will then use the bias fusible tape to secure those edges and then turn the edges for hemming.  This fabric, which is the overlay for my top, will then be attached to the solid red fabric.

Up dates on progress later.

Sunday, August 23, 2015

Next project-Itch to Stitch

I have acquired several independent patterns for the past couple of years and have made up a few. My most recent was the Kirsten Kimono Top and made two of those with good success.

I am now working on another indie pattern, the Paulina Top from Itch to Stitch.
I have prepared fabric I purchased from Vogue Fabrics early this year for this top, washing and drying it last night.
The black, gray, red and white fabric is a knit lace fabric and I wanted that to be the underlying fabric, yet the lace is very open and will not work for me as that underlying fabric.  So I will make it the top fabric and the red will show through.

I printed the pattern pieces.  The one thing I truly like about this pattern is that it contains layers which allow you to print only the size(s) you need instead of all the sizes making it more cumbersome to trace your size.  I printed only the 12/14 sizes.  All the taping was put together last night and tracing was started and now completed.

I pin fitted the traced pattern pieces and determined that I only need to make a swayback adjustment for the bodice pieces.  The sleeves with this pattern are very full.  I don't care for all of that fullness. If you look at the above photo of the top, the sleeves on the model are very full looking also.  I took out 1.25 inches from the width of the sleeves from under arm to hem.  I also reduced the length by 1.5 inches.

Off to cut out the fabric, set up machines and sew.  More information to follow.


August Sewing Simplicity 7295

 I am not doing well as a blogger. I have been working on this project since July 30. Today, I finally finished it. It has been a stop-and-g...