Showing posts with label PMB. Show all posts

Monday, January 20, 2014

Catching up

Last week I was out of town for a few days for business travel.  The rest of the week was a work week for h***.  The ending of the week was good as not only was my birthday coming up; it was a long weekend as I had today off as well!

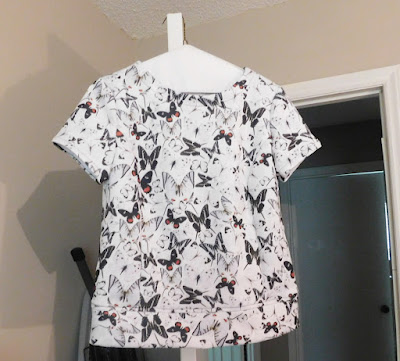
So having some extra time this weekend, I completed my garment of the month which was the Kwik Sew top #4028 using a knit fabric from Fabric Mart. I am not all that happy about the top.  First it is too low at the neckline and I have to keep playing with the drape to get it to lay like I want.  I even raised the neckline 1.5 inches and still too low.  I have another drape neck pattern from KS that the neckline is too low as well.  I cut a medium in upper chest and shoulders switching to large at bust to bottom.  It was also way too long; I should have caught that during the fitting process.  After cutting off an 1inch and 1/2, I ended up hemming it another 1.25 inches and it called for 5/8 hem allowance.  Sleeves are cut on which were okay. 

I cropped photo as I did not have on much make up and I looked really wiped out with out it.  Here is a view of the back.
Even with sway back adjustment I needed to take out additional length in the back.  If I make this again and I doubt it, I will make that adjustment.
Sorry about the jeans and shoes in the photo above.  I was in a hurry to get some pictures taken.  Here is the top with black/camel skirt that I just don't like at all.  I have pressed and pressed this skirt and it still looks wrinkled.  I just can't get the fit right.

I know I sound "whiny" but I am just not loving my recent garment makes.

The other garment that I had not photographed is the McCall's 6844 oatmeal colored boucle knit.


I have a love-hate going on with this jacket.  I should have cut off more from the shoulder.  The boucle knit is rather bulky and I ended up stitching the lapels from hemline to waistline as they would not stay folded back and that definitely added bulk to me!  Not the look I was going for.
By stitching down the lapels it hangs better in the front.
I wish I had trimmed off some of the length of peplum in the back.  I feel it is too long.  I realized also that when I took this photo I had not removed some pins where I had pinned a deeper seam at the back peplum thinking that was a solution to the back length; I am still thinking on that one.  Thus the right side is hanging somewhat "wonky".

I decided to sew something with more color today.  It is a knit fabric I acquired from EOSin 2013.  This picture does not do it justice.

I am making the Renfrew cowl neck top from Sewaholic Patterns.  I made this one previously with good success and so far so good with this one. 

So back to work tomorrow.  And possibly snow in our future.  Later.

Tuesday, December 31, 2013

Garments in process

Here is photo of camel/black skirt waiting to be hemmed-
I am actually pleased with the final outcome of this skirt.  I drafted a pattern using Pattern Master Boutique, a software program for pattern drafting.  I definitely drafted it too large, so there were lots of fitting issues during the sewing process.  Once all were made, I think it looks very much like the inspiration skirt.
Colorblock Skirt  - Undeniably flattering, this must-have power piece rocks the colorblock with a bold contrast stripe, punctuated with an exposed metal zipper for a bit of edgy detail. Exposed metal front zipper with snap closure. Lined. 23" from top edge.
Today was second day of vacation and spent most of the day in sewing room.  Instead of hemming the skirt, I finished final tweaks to M6844 and cut out fabric using  two double knit fabric from stash.  One piece was material used to make a Butterick dress and Magic pencil skirt.  I also used the black double knit from the dress also.
I almost finished the cardigan, just a little more to go.  I know that future versions will require a few more tweaks.  I will share more details later. 


Sunday, December 08, 2013

Camel/black skirt

Here is the camel/black skirt front on cutting table. 


Here is the front pinned on the AlmaMarie.


This is a close up of the front zipper


Posted by Picasa

I was not able to make much sewing progress this weekend.  This is not that complicated of a skirt to sew; the more time consuming part-intalling the zipper-has now been done.  Next is to baste side seams for fitting and then finish sewing lining pieces together and attach at waist line and hem!

More business travel next week so this will not get attention until I return. 

Sunday, December 01, 2013

Inspiration skirt is up next

I started on the camel/black skirt today.  The pattern I am using is one I drafted using Pattern Master Boutique.  I had not cut out the lining fabric until this AM and that is now complete

Let me say that sewing on this fabric is a breath of fresh air after sewing the faux leather!!  I sewed the darts and the center back seam in both the fabric and lining this AM.  I had to stop at that point as I had some other home chores to completed that has not gotten my attention during my time off.

I am trying to decide my garment of the month for December.  It will not be this skirt.  I am thinking of making McCall's 6844.  Most likely I will use the newest fabric purchase from EOS.

Later.

Saturday, November 23, 2013

The look of progress

The camel and black skirt has been cut out.  I have not cut out the lining yet as I decided to cut out the faux leather skirt this evening.

Here is shot of the faux leather skirt cut out.  I still have a good amount of the fabric left and hopefully can use it to make a simple jacket.   The backing of this skirt is felt/knit backing and I was able to press out the fold lines in the fabric pressing with light steam and light heat setting. 


Friday, November 22, 2013

My first day of staycation

It was so nice to start my staycation today!  I am off from work until Dec. 2.


To start the day off, I began finalizing the pattern draft for the camel and black skirt.  As I posted previously I printed a skirt pattern using Pattern Master Boutique.  The fit was off and I updated my measurements in the software program and changed the skirt pattern so that it drafted for skirt with a center front zipper.
There is a feature with the program to edit the pattern pieces; I am just not proficient with that component of the software.  I re-drafted the pattern manually.

After tracing the new pattern I pin fitted the traced pattern.  I made a small adjustment and the I traced a second front piece. The front piece had a dart and so I drew a line through the dart for the left front, cut through the line and then added 5/8 seam allowance to that front piece.  To the right front I added what I cut off from the left traced front creating my asymmetrical front with exposed zipper.

For the back piece I added a center back seam as it is with the inspiration skirt.  The inspiration skirt's zipper is actually longer than the ones I ordered so I took a chance that I might find the right zipper at JoAnn's and lucky me I did!!  Here is photo of the pieces pinned together after drafting and fitting.


I redrafted the facing pieces to match up with the new front pieces.  I may not use them as I plan to line the skirt and attach the lining at the waistline.

I have decided to use V8750 for the faux leather skirt.  I have made it twice so the fit is perfected and I like the style. I plan to cut out both skirt patterns tomorrow so I can move forward with sewing both of them over the staycation/holiday week.


Sunday, November 17, 2013

What skirt will it be--

I pulled several skirt patterns today to decide on what the faux leather skirt should look like.  I still have not decided.  Here are some of my choices from pattern collection.
I have made this one twice and I love the fit of it.  Neither one were lined as the pattern did not call for it and the fabric used really did not need it.  I think with this faux leather I may want to line it.  If I do I will just make a simple lining without all of the pieces for this skirt.

I have made this one also with success.
And this one also.

I have a Hot Pattern skirt also that I am considering.  My success with this brand has not always been very good.  There is is also a Sandra Betzina one that I like as well but I would have to shorten it considerably.

Now for my color block skirt.  With all the patterns I have in my stash I did not find one that had a simple front piece with no waist band.  So I decided to draft one using Pattern Master Boutique 5.

I have not used this in some time so had to re-learn how to use several of the features. This is my first print of a classic skirt style with facings.
After printing and taping pages together, I then traced on to Swedish Tracing Paper to more easily test the fit by pin fitting.  After doing that and then pin fitting it was clear that I really needed to update my measurements in the program.  I also changed the style of the pattern to allow my being able to have a two panels in front and adjust so panels were asymmetrical.  I now need to trace and pin fit this new pattern.

I hope your weekend was one of pleasure and sewing.  More later.


Wednesday, July 16, 2008

What I wore

There have been several blogs posting garments made that the sewist has worn to work or other places. So I thought I would post some recent garments I've worn to work..
The dress and coat were made using PMB3. They were inspired by a Talbot's dress and jacket. The jacket fabric was either from Vogue Fabrics or Fashion Fabric Club. The dress fabric I can't remember where I got it; but I love how the dress holds up after wearing all day. These photos were taken before leaving to go to work.
This is a Vogue pattern. The fabric came from Sawyer Brooks. It is a lovely buttery yellow background with palm trees. There are palm trees woven into the fabric as well.

This is the first Jalie 2794 top I made. I wore this today with a purchased black suit with white trim. The suit is a Kasper suit from a microfiber that does not wrinkle. This is the end of the day look.


Sunday, June 01, 2008

PMB Feedback

Thanks to Dana, Towanda and Els for their comments regarding the pattern draft. Towanda, I will send my measurements to Karen at Wild Ginger. I think that the dart uptake and side arm point are options I should try. I read more in the User's Guide. The bra cup size I think is also affecting the draft as I read the guide.

Saturday, May 31, 2008

Pattern drafting with PMB4

I have been using Pattern Master Boutique since early 2001. I have made several jackets, sheath style dresses, tops and skirts using this program. Recently they upgraded the program I purchased the upgrade-PMB4.
Since then, my age and thus my shape and size have changed. So I tweaked my measurements. This new upgrade has some nice new features and I really want to use it again. But dang! I am having a hard time getting a good fit. I spent time last weekend drafting several versions without good results.

I have a tendency to get a little obsessed about getting something like this correct. So I spent most of the afternoon again trying to figure out why the pattern is drafting the way it is. The issue is this-- the side seam for the dress bodice is not hanging straight from under the arm down. Instead the underarm seam is more toward the back side and then about midway from underarm to waistline it straightens and hangs correctly. Below is a rough idea of what is happening. Imagine the lines as the side seam under the arm. There are fitting guides with the program but I am not finding this issue. I have also pulled out another fitting book, trying to figure this out. So if you have any ideas or opinions, please leave a comment.


As of now, I have decided to put this aside. I have a large number of dress patterns and decided to use a Vogue dress pattern that I made last year. I am going to use that to make the dress to go with the jacket I just completed. Time is moving on and I have more projects I want to tackle besides this dress.

Sunday, May 25, 2008

Jacket is complete

I did complete my jacket after sewing my finger. I am pleased with the outcome. I took photos and will post them tomorrow.

I drafted a dress pattern using PMB4 and having to tweak the bodice pieces a little before I cut out my dress fabric. I hope to get the fabric cut out and start sewing it tomorrow. I am not making as much progress sewing as I had hoped or visualized. My DH is off as well. Enough said!

Saturday, January 12, 2008

M5466

I had thoughts about this being my next project. I posted here about drafting a similar dress from PMB and overlaying it onto the McCall's pattern. I pin fitted both the PMB bodice and the McCall bodice. PMB bodice is too short waisted, this is a measurement that I know I need to tweak with this software program. I normally make sheath style dresses so the waist line is not too much of a factor when using PMB. Interestingly the McCall's pattern was a little short waisted also.

I would need to make a FBA with the McCall's pattern. After pinning the front and back McCall's bodice I have decided that this neckline is just not going to be one that I will be comfortable wearing. It is just so wide and low. I can see myself pulling on the neckline/shoulder area.

My draft using PMB and then doing the manual adjustments to attempt to replicate the McCall's neckline, only making it higher, just does not work for me. I decided I will move on to something else. I want to make a dress and I pulled out some other dress patterns that I have and have narrowed my choices to three Vogue patterns and the Go Patterns-Sleeveless Dress.

Meanwhile I have cleaned up the sewing room and will start anew tomorrow.

Monday, January 07, 2008

Working my plan

I did cut out the knit top yesterday morning. I have enough left over to make up another top as long as it is short sleeved or a tank style.

I then taped together the printed out pattern pieces from PMB version of the McCall dress pattern. After I do this I like to trace over the pattern using Swedish Tracing paper.
I took the McCall's pattern pieces and overlaid it onto the PMB pieces for the front and back bodice. The neckline for McCall's is about two inches or more lower than the PMB draft. I expected that because of the limited neckline draft on PMB. Once I pinned the dart on PMB piece and tucks on McCall's, I found that the bodice through the shoulders and armscye were off some but not extremely so. The bust point on the McCall's was about 1/2 inch higher than mine. There was some variance in the waistline area and the bust width was off about 1 1/2 inches which is about the usual FBA I have to make with most pattern pieces.

The skirt pieces were overlaid onto PMB pattern pieces. Interestingly but not surprisingly the hip measurement for me and the finished hip measurement on the pattern were at odds. If I used what was printed on the McCall's pattern piece I may have run into a fitting issue as I would have gone with the smaller size but overlaying on my PMB piece with new hip measurement, the largest size in the McCall pattern would have been more appropriate. That measurement was noted to be 46 inches. I am 39.????????? There is not much difference between my waist and hip measurement-only 5 inches so waist line on McCall's would have been snug as well.

PMB has some limitations with style. For example, the McCall's dress has several neckline tucks. My choice with PM is one neckline dart. You can go into the editor function and move darts around and adjust their size. I could not get the tutorial part of the program to work yesterday so I kept messing up on this function.

Having traced the front bodice, I then overlaid this onto another piece of tracing paper. Using my Helen Armstrong Pattern Drafting book, I redrafted the neckline so I could have a cluster of darts, tucks or pleats. I wanted to do this because the neckline dart with PMB was just one and it was rather large; and I wanted to simulate the neckline from McCalls.

That is where I stopped yesterday. I want to move forward with morphing the patterns so I can out the dress pattern. I will also line the fabric I plan to use as it is wool and do not want wool against my skin. It definitely makes me itch.

Sunday, January 14, 2007

Sewing Progress for PMB Jacket

I have been busy with drafting, printing, fitting and starting my PMB Jacket. I used the Classic Style draft for the jacket using PMB software. I then removed all waist darts and kept only the side dart. For front closure, I chose a zipper closure, only because this will allow me to keep the front with no closure and no overlap to have to cut off. I lengthened the jacket from my original draft after fitting I discovered that with 1 1/2 to 2 inch hem, the jacket would be too short. Thus lengthening gives me a deeper hem allowance and a jacket that will fall close to hip area.


I embroidered the fronts using my Endless Hoop which allows for easy alignment of an endless embroidery. Photos below show my progress.

Pattern laid out with extra fabric around edges to allow for loss with embroidery.


Other pieces laid out for cutting.


One front piece with embroidery down the front opening. Blue lines
are for alignment and are outside the final cutting area.


This shows the Endless Hoop used with a print out of the embroidery on
paper to help align the design where you want it.

Monday, January 08, 2007

PMB Jacket

I drafted a jacket pattern yesterday using Pattern Master Boutique 3. I keep seeing this very simple style jacket in the local Macys. It is short, no closure with bust darts only, somewhat boxy and short. The front edges are embroidered or have some sort of decorative stitches. Not very pricey-yet I have similar fabric, great sewing and embroidery machines that I could use to replicate.


I have decided to move this to the front of my sewing list. I need a more adventurous project now that I have sewn two knit tops that was to be easy and fast sewing. They were easy just not sure if I want to call them fast.


I am using a faux suede fabric with satin backing. This is exactly the fabric of the jacket at Macy's. I have not embroidered on this type fabric before so will attempt a test embroidery hopefully one evening this week. I purchased this fabric about two years ago from a sewing/fabric store in Harrisonburg. I am also somewhat motivated because of the stash contest on PR. I am again focusing on what I have on hand and not out to make numerous fabric purchases from other sources currently.


Here is a photo of the printed and taped pattern that PMB produces.

This is the front of the jacket. Normally if I draft a new pattern and one not previously made, I will trace the pattern using Swedish tracing paper. Then I can pin or machine baste the tracing paper for fitting. I normally make any adjustments onto the tracing paper and make note of that. I then attach tracing to printed PMB pattern for storing.

August Sewing Simplicity 7295

 I am not doing well as a blogger. I have been working on this project since July 30. Today, I finally finished it. It has been a stop-and-g...