Sunday, August 28, 2022

August Sewing Simplicity 7295

 I am not doing well as a blogger. I have been working on this project since July 30. Today, I finally finished it. It has been a stop-and-go project. The sewjo comes and goes.

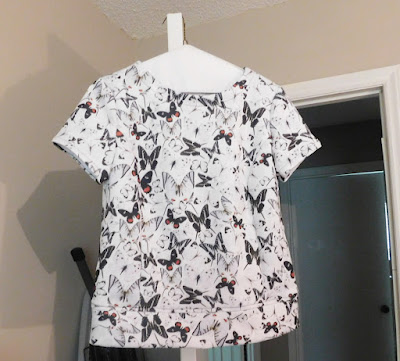
I used the stash fabric of scuba knit I purchased from Mood in 2015. I call it scuba knit yet Mood's label said neoprene. I think that they are similar.

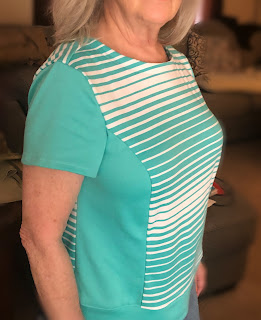
Here is a pic of the completed top. The plan is to take more pics of this with me wearing it. I have another top that I want to take pictures of me wearing. I mentioned doing this in a previous post.


Pattern Review is having a fabric stash contest and as I complete future projects, I will use my fabric stash. With inflation, I have cut back on fabric buying and I have 4 large containers of fabric so I really don't need to buy more fabric.

Not sure what's next. I had planned to make a Love Notions LDT yet the fabric and that plan were put aside. I have several indie patterns in my pattern stash and want to use some of those.  

Some updates to follow.


Saturday, July 30, 2022

Simplicity 9275

 On to the next project. I made this pattern previously. I made View C.


 I wear the top frequently though I feel it is a little large on me. I keep saying I am going to take up the side seams but with the bottom band it will be more work than I want to put into. Here is the first version.


The side view does not look as large as the front view. I decided to go down one size with this new version. Simplicity patterns tend to run large on me.

The fabric I will be using is a scuba knit from Mood, which I purchased in 2015. It is a mostly black and white color scheme with butterflies all over it. Again I could not find a pic of it in any of my fabric files. I am going to cut out the fabric when I finish with this post. More details to follow.

Wednesday, July 27, 2022

Two projects for July.

 I had visions of having several items completed this month. 

I did complete


McCall's 6964 top pattern. I wore the top last week and I like the fit and the look. I had planned to take pictures after  I wore the top. By the time I got home, I was too tired.  I do have this pic of the completed top.  This is an EOS fabric acquired several years ago.


I then started making a second top, one I had made previously. This is Simplicity 9273.


This is my first version and I was disappointed with how the sleeves turned out. It was okay and I have worn it several times for Zoom meetings. The pleats collapse and have no resemblance to the pattern drawing. Otherwise, it is a good fit.


This time I decided I would sew the view that the model is wearing. The fabric I used was one I had purchased several years ago. I have looked through all my fabric pics from 2010 to the present and for whatever reason, I do not have this fabric in any of the albums. It is navy blue french terry with red lips.

I wanted this fabric because I had seen a DVF wrap dress which too was navy blue with red lips. Her fabric was very flowy and of much better quality. I could not find a similar fabric until I came upon this.  I had about four yards of this fabric.

Unfortunately, I had issues with this fabric and the view I selected. There is a lot of gathering and this fabric did not do well. Even the sleeves with this one just did not look like the models. Perhaps a non-french terry knit would have been better. I am so flummoxed over this that I turned it into a wadder.


I am glad I have quite a bit of this fabric left over. I will decide on another pattern to try. I have my Laundry Day Tee pattern ready to sew, perhaps this fabric will work better for that. Or not.

More later!


Saturday, June 18, 2022

New Project, Favorite Pattern

 I decided to cut out a few patterns using fabrics from my stash. I am hopeful that if I cut out two or more patterns I will be more motivated to sew.

This fabric was a gift from Emma One Sock as part of a Thanks for Giving activity on Pattern Review. This has been in my stash since 2018. I decided it was time to make something of it. I had enough to make a top.


I have made 3 tops from this pattern, that fit well even today. I still have the tops and wear them at least once or twice a month. Those are made from Emma One Sock rayon knit fabric.  Top-quality. That is the reason they are still wearable today.


I recently saw a couple of reviews on PR recently and decided to pull this from the pattern stash to sew again. I did add a little more width to side seams at the waist to hip area as there is some extra width on me. 

The great thing about TNT patterns are any adjustments have already been made and thus can cut the fabric and sew.

I also pulled the fabric to use for this pattern previously sewn in the past year.

I looked through pictures of the fabric but did not find a picture of this fabric. It is a navy blue french terry with red lips. I will post this later. I obviously loved the fabric as I have five yards or more of it.

That's it for now. More later.


Saturday, June 11, 2022

Disappointed 😞

 I am very disappointed with this SoSewEnglish Florence top pattern. It is not only the pattern; my fabric choice and colors are disappointing as well. The style was not flattering.

The pattern provided a range of sizes and I selected the sizes that I normally would use with other patterns. This ended up with a fit that was way too large for me. There was no information about ease which in my opinion is critical for a pattern style like this and many other indie patterns provide this.

It calls for a 1/4 inch seam allowance which was not a deal-breaker when purchasing the pattern but I am not fond of 1/4 inch seam allowance. I prefer 3/8 to 5/8 inches. In the end with the overly large fit, I ended up taking a 5/8 inch seam allowance for side seams.

Front view-a pregnant look not for an older woman.


The bodice has princess seams which I took an additional 3/8 inch after attaching to the peplum. I cut off 3/8 inches at the shoulder before inserting the sleeves.

With all the handling the neckline stretched out. My fault as I should have stayed stitched or used fusible knit seam tape to prevent this.

I normally do not wear these colors, yet I was drawn to the fabric when purchased. Not my best fabric decision.

Other adjustments made before sewing were lengthening the bodice as the bust area would have been right up against the boobs. The gathered skirt had no pattern piece but the information was provided on how wide and length the skirt should be cut. I shortened the skirt length by 1 inch.   I did my usual upper back adjustment and raised the front neckline by 1 1/2 inches.

After all, was sewn together, I almost decided to donate to charity or simply wad it up. I decided that I can wear this at home when doing chores around the house. I did a short serge stitch for the sleeve and bottom hems.
 
Here are two more pics of this top. The best view is of the back.


I have about 1 1/3 yards left of this fabric. I may be able to incorporate it as a separate piece for a color-blocked top.  On to the next project.


Thursday, May 19, 2022

Progress

 I am sewing this pattern from SoSewEnglish; Florence Dress and Top.  I am also using this fabric from them.

Pastel Patchwork Knit


I was drawn to this fabric and not sure why. I normally I do not go for pastel colors, much less pink fabrics. My white/gray hair and light skin may prove this will wash me out even more. Nonetheless, I liked it.

I have finally completed the bodice part. To me, the sizing ran large. In the end, I used sizes medium, large and extra-large. I raised the front neckline about two inches and I am glad I did as the neckline is defined as square neck scooped. Too scooped for me and not as squared as I thought. I found the shoulders rather long and after trimming I think they are close to the medium size.

Bodice WIP.

I chose the flutter sleeve; there are various sleeve lengths and options. Plus a tank top bodice.

I was going to go with a two-tier add-on to the bodice. After fiddling with the bodice sizing, I decided to just go with one-tier. I discovered while printing out the bodice and sleeves that the tiers did not have a pattern piece. You had to use the guide showing the width and length inches to cut. I always find that when I have to cut using this method, I am not happy. Especially when using a thinner knit and having to make sure your drawn lines are accurate while keeping fabric in place.
Two tiers (rectangles)

You cut two pieces, one front tier and one for the back tier. They have you gather the pieces and sew them together forming a side seam. Then attach the tiers to the bodice. Before sewing together you have to make sure the gathered edge line up with the bodice front and back. The bodice sleeves and side seams have already been sewn. I am going to follow these instructions knowing that I normally sew front tier to front and back tier to back. Then sew side seam from hem to sleeve hem. 


Tiers will be gathered and sewn later today or tomorrow.

More updates to follow.


Tuesday, May 17, 2022

I Am Still Around

 I have been in a funk for several weeks now. The last item I sewed was a robe for our trip we took in early April.  We had a great time visiting family and friends. I almost find I am a little homesick.

With inflation and the rise and fall of the stock market, my husband's increase in medication costs has taken a bite out of our financial situation. I have refrained from buying fabric, I don't really need more, but I do still want some new pieces. I have purchased a couple of patterns from Itch to Stich and recently one from So Sew English.

I am actually starting to get the urge to sew. I am now working on the SSE pattern, Florence top, and dress. I have some difficulty with getting the right size printed and printed the bodice piece twice. I am between so many sizes and using their sizing guide helps but it was too big in some areas and just right in others. Every indie pattern company has differing sizes plus most are designed for a much taller person than I.

I was surprised to see I have not posted anything since March. I had planned to post about the robe and will do that in the near future. The near future may mean more than a couple of days or weeks.

More later!


Monday, March 07, 2022

Tuesday, March 01, 2022

No pics for now just words

 I finally completed Simplicity 9384. I like the pattern and will sew it again. I am not sure that the fabric I used was the right choice. It met the stretch requirements and it is a double knit which was a suggested fabric.

Some fitting adjustments I made during the sewing process resulted in a closer fit than I desired. I think the fabric I used did not have the drape as the model's top appears to have.

One of the rookie mistakes I made was not paying close attention to the pattern drawings. I cut View A  thinking it was the same as on the model. NOT!

 I followed the extensive instructions on making the pleats, which required sewing and basting.  Once that was done I attached the sleeves my way, not per the instructions. This allowed me to baste the side and sleeve seam for fitting.

Standing in front of the hallway mirror, I had a moment of total disbelief. The top hung down to my knees; it looked like a huge dress, not a top. I always have to shorten the length of the Big 4 patterns and had reduced the length by 1 1/2 inches. I am saying to myself what the heck plus a few other explicative.

Back to the sewing room, I finally realized that View A was a tunic and View B fell at the hipline which was the look I was going for. For me to undo the seams that form the bodice and the pleats and the topstitching of the pleats was not going to happen. The difference between the two lengths measured 6 inches. So I measured and marked six inches from the bottom and cut with a rotary cutter and scissors.

I could go on and on with other fitting issues and rookie things I did to fix things. I'll save those for the review of the pattern. 

 One positive to add to this post is that my new sewing machine did very well for this project. YEAH!. For the price I paid  I think I got a very durable machine.  The fabric was thick in places and handled it very well. The topstitching foot worked perfectly.  

More info to follow with pics!


Sunday, February 20, 2022

Singer and Simplicity

 Here is a quick peek at my current project that is taking me forever to complete.


 I really made some rookie mistakes and I think that I was just in a hurry to sew something. This is Simplicity 9384. I am using this fabric, purchased in 2014 from Sew Much Fabric. This is a double knit and I remember seeing so many people making garments from it and of course I jumped on that buying spree. Obviously, I did not make what I had planned which was a dress for work. Don't need dresses so it becomes a top without the hoodie. I will share more about my sewing issues with this project.


I wanted to give a brief update on using my new Singer sewing machine, Quantum Stylist 9960 for this project.

The machine is a quiet one and the stitches sewed great on this heavier, hefty fabric. The machine is computerized yet there are buttons to push to make changes to the stitch being used. With my touchscreen machine that died, I find I want to touch the screen but that is not how it works. There are numerous buttons and they have various purposes, so I am having to refer to the manual to make sure I am using the right button.

One feature I love is the automatic thread cutting. There is a button with a scissor above it. When you stop sewing and are ready to remove the fabric, click that button and it cuts both top and bottom threads. I am beginning to use that frequently. It saves some sewing time. 

The extension table that came with the machine works great and is much needed for sewing fabric. The light is bright. And I had a standing floor lamp that became the standing sewing light because you need good lighting and my other light is placed near the serger and cover stitch machines.

The only negative for me is the basting stitch. It requires lowering the feed dogs and using a darning foot. You sew a stitch then you have to move the fabric before it makes another stitch. I am getting a rhythm with this but I am not fond of it. 

I knew when I purchased it that it was not one of the high-end machines yet it is doing well so far with sewing a hefty fabric with great stitches.

 My sewing room is not what I want or plan for it to be. It is workable and I was wanting to sew something as it has been a while since I sewed. I will do a post in the future of the room once I finally get rid of clutter.

More to follow about the Simplicity top soon.


Friday, January 28, 2022

New Sewing Machine

 My Husqvarna Designer SE died after moving. It started a slow death prior to moving and I mentioned this in my previous post.

It was a sewing and embroidery machine. I don't embroider as much as I did once so decided I did not need a combo machine. I have a Singer stand-alone embroidery machine; should I decide to embroider something; it is simple but provides a nice embroidered item.

Lots of photos follow of my new sewing machine that fits my current budget. I purchased a Singer Quantum Stylist 9960. The Singer sewing machine was my first that my Grandmother bought for me back in the early '70s.


A local dealer sells Brothers and I was not interested. I looked at Baby Lock as well as Husqvarna websites and both websites were not showing much in the way of machines that appealed to me or fit my budget. Actually, Baby Lock seemed to have no sewing machines on the website. I also thought about Janome as well as Singer. Husqvarna's Jade was another machine considered but it wasn't appealing style-wise and had limited feet.

The one that fit my budget was the Singer model. I was enticed by the fact that the deal being offered included an extension table and you can remove the regular sewing bed and attach this one


and numerous sewing feet that come with the machine and are stored inside the sewing bed attached case


Also as part of the package, I  received several specialty feet and the special foot holder to be used with these. 


I can sew using the foot control or start/stop button. It also has a thread cutter that cuts upper and bobbin thread. I normally don't use the start/stop preferring foot control. I tested this while learning how to use this machine and I found I liked it. I really like the thread cutter and needle up-down button.


There are a number of buttons to select utility stitches and buttonholes, plus other buttons to lengthen or shorten stitch length and width. You use upper buttons to select these and you have to push the adjustment button on the bottom row. With the Designer SE, all of that was performed with a touch screen.  The challenge with the button is learning what to touch first and the included manual is well designed and easy to follow on steps needed. I like the touch screen better but had to trade-off that for price. The screen is not in color but find it easy to see.


The stitch quality is good and I have tried straight, zigzag and a few decorative stitches.

All in all, I am satisfied with the machine and preparing to sew my first project soon. The next post soon will be a blog on the sewing room. I find I want to trade out some tables for something else and considering buying shelving with 4 or 5 shelves. What I have now works okay but really need more room! Still need a few more set up steps to be complete.

Later!!


August Sewing Simplicity 7295

 I am not doing well as a blogger. I have been working on this project since July 30. Today, I finally finished it. It has been a stop-and-g...