Tuesday, July 30, 2019

Current project

I am putting aside the G&G pattern as the drafting seems off to me.  The asymmetrical neckline pieces did not align when taping pieces together.  I was able to align it by drawing new lines.

As most of you know I do the pin fitting method for almost all of my patterns. Attempting this with this pattern was an eye-opener.  The bottom of the armhole was way too high after pinning the shoulders. I normally sew size 14-16 with the Big 4 and even most indie patterns.  I need to revaluate the drafting of this pattern as perhaps I need a size or two larger than this for this pattern line.

I decided to sew some paper patterns and will now work on Simplicity 8889

I just cut around the top pattern pieces and will pin fit them next. After reading a few reviews on PR, I will most likely lengthen the front as I want it to cover more of my abdomen. I will adjust the back as well to keep the high/low look.

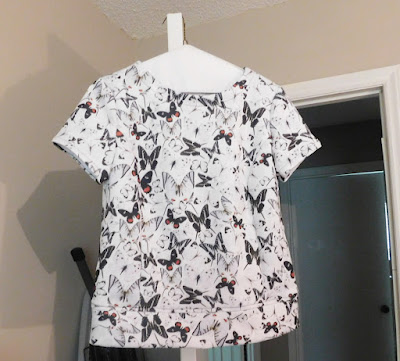
The McCall's top is complete and once I press it I will take some pictures of me wearing.  The snaps worked out great!

More updates later!


Friday, July 19, 2019

Projects Planned

Good news! My order from SnapSource arrived and the new snaps match those I had attached to the shirt.  My top will finally be finished!😀 I hope to take photos of the finished product later today.

Next up-I have two projects I plan to work on.

One is knit top using a pattern from George and Ginger.  I have not sewn any patterns from this company previously.  I hope to have good success with them.  The pattern I will be using is the Rave Shirt Set.


I plan to make the asymmetrical neckline.  

The fabric is a light blue lightweight sweater knit I purchased from Hobby Lobby. I think I purchased this earlier this year.


For the other project, I will be using this cotton fabric from a local quilt shop. 

I will be using the top from this Mimi G Simplicity pattern.


Thanks for stopping by.


Tuesday, July 16, 2019

The Shirt that almost wasn't or the pattern from hell Part 2

SEWING AND ISSUES PART 2

The next step was to insert the sleeves.  I was truly proud that I was able to cut the sleeves with matching design borders.  The first sleeve went in okay with one slight pucker and I removed some stitches and easily fixed.

The second sleeve gave me heartburn.  I could not insert that sleeve without getting puckers at the shoulder area. I cut the sleeves separately to make sure the border matched for each sleeve.  Perhaps the second sleeve was a little off. I placed the pattern on top of this and found it was cut correctly.  I removed the stitching and resewed the basting stitches to be able to create ease for the sleeve.  I then inserted again and sewed. I ended up catching some sleeve fabric in the same area thus creating another issue.  I had to remove those stitches to release some of the sleeve fabric that was not supposed to be there. In doing so, I ended up removing some of the basting creating yet another issue for appropriate insertion.  Restitched basting and adjusted to hopefully get the sleeve right.  I had a teeny tiny small tuck that I left as it is not that noticeable because of the fabric design. (Sorry no pictures of this)!

I then serged the sleeve hem edge, turned up the hem and topstitched in place.

Hemmed sleeve
Next, I was ready to stitch buttonholes and sew on buttons. That's when I realized I did not have appropriate buttons as I thought I did.  The only two sources for buttons in my area are Walmart and Hobby Lobby. Walmart's were not good or the right size.  I then thought about covering buttons and decided not to. I then saw black metal snaps from Snap Source in my stash; they looked more brown against the fabric. So I got out my Snap Source tools and proceeded to attach snaps. I tested one on scrap fabric and I could not get it to work.  It has really been a long time since I had used.  I went to Snap Souce website and looked at their tutorial and discovered I was using the wrong base part for the size snap and needed to turn the middle part of the tool to the appropriate side.  I got this one to work.

I proceeded to attach four more. I had an issue with one of those and had to remove and replace.
Next, I had to attach the underside of the snaps to the other front band. I attached two and wanted to make sure that they were aligning with the top part on the other front. They did, BUT, there was an issue as the second snap outer part had not sealed correctly.  This required me to remove it. AND THEN, I found that I did not have another one as the prongs on others were smashed and per the website, you need to throw away because it just will not work.  This is true and I hoped to prove them wrong.

I decided to order new ones that were black metal but I am now concerned that these may not match.  There was also a sampler of all the painted, metal and pearl snaps so I ordered that hoping that one of metal sample ones will work, i.e. closer match in color, in case.

Thus I am now waiting for my order; I got an email this morning saying that my order had shipped.
Not sure what the outcome will be.  I am moving on to the next project until the snaps come in. The shirt is still in the wasn't category.

Closing comments: All of this was sewing errors on my part.  Actually, the pattern is not the issue and it is well drafted with good instructions; except I like the collar attachment I used instead of theirs. I also will not hem the shirt first again, I will wait until the front bands are attached and hem at the same time.

I will post the final outcome after the snaps arrive!


Sunday, July 14, 2019

The shirt that almost wasn't or the pattern from hell! Part 1

I have been working on and off this project for several months now.  I want to note that this was more my sewing block and not the pattern. However, my fitting issues required making numerous pattern adjustments that took more time to make than cutting out the fabric.

ADJUSTMENTS AND CUTTING

Adjustments made were:

  • FSA of 5/8
  • FBA of 1 1/2 inches
  • Narrow upper back adjustment of 3/8 inches
  • High round back adjustment of 5/8 inches
  • Shortened the length by 2 inches
  • Swayback adjustment of 5/8 inches
The adjustments were very time consuming. There are two front pieces for this view as the front is asymmetrical.  Thus two separate FBA's, two forward shoulder adjustments.  The length was shortened for both fronts and the back.  The back piece is only one piece but incorporates the asymmetrical feature for this view so that it lines up with the front pieces. I worked hard to make sure that those sides lined up with the fronts. I also had to make my usual 5/8 inch sway back adjustment.

One front piece adjustment
Because the back was one piece I had to cut down the center of the back pattern to make the back adjustments for both halves then tape them back together again.  If I had not chosen to make this version then the back would have been cut on the fold.
Back taped together after adjustments

I also had to make the same adjustments to the front bands to align with front pieces.

I then went into a sewist block and then I finally got around to cutting the fabric, once I was able to determine the layout for the design. The fabric was in my stash for a couple of years and I think I purchased from Fabric Mart.  I know that when I received the fabric it was not what I was expecting and stashed it away for later use. I almost gave it away when we were preparing to move last year. 

I still was not in the mood to sew and the project sat for a while. I read a review on Pattern Review of the same version I was making and that gave me the push to start to sew.

SEWING AND ISSUES-PART ONE

The darts were sewn first. I serged all side seams of the fronts, back, and shoulders. I basted the side seams after sewing the shoulders and realized that dart length was too long; and that the FBA I made was just a tad too little. Side seams from underarm through bust to the waist were to be 3/8 inch instead of 5/8.  Shortening the dart gave me a little more room. BUT, one dart gave me an issue with my adjustment and I made several attempts to fix and it still is not perfect but good enough.

I decided to follow the instructions after attaching the shoulder and side seams.  They called for hemming the shirt all around before attaching the front band. Alarm bells went off as I have used this method before and had a hell of a time attaching bands and turning the bottom band edges to match the now hemmed front.  This was years ago and I have more experience now, I can do this. NOT! The front band pieces were too short IMHO as it did not give me much fabric to turn under.  This was what the alarm bells were telling me to begin with. 

So I removed these and cut new ones.  I had to cut new interfacing as well. I cut the second pair longer and still had a hard time following the written instructions as well as the drawing.  In the end, I attached stopping a little above the front hemlines, folded in the edges and stitched across the band bottoms matching my stitching with the hem stitches.
Front hem before front bands attached.
Front band attached, not pressed in this picture
The instructions have you to slip stitch the bands on the inside. Hand sewing is something I avoid as much as possible. I have never seen handstitching in any garment I purchased in RTW and think I should not with the garments I sew. I topstitched the bands instead.

Next step is to fuse interfacing to one collar and one collar band.  I followed the instructions to sew the collar band and collar to the neckline using what is a traditional method.  Of course, it did not turn out well giving me my usual poor looking collar with collar band. I removed some stitches and tried again, no bueno! So I removed this and recut new collar bands and new collar, plus more interfacing. Lucky me that I had a lot of this fabric. Before I started attaching the new bands and collars, I remembered the easier technique I used on my Closet Case shirtdress from last year. I went to the website and printed out the instructions. This worked beautifully and I strongly recommend trying this method. I will be using this going forward.

I will stop now and will post the final sewing steps in my next post.

Sunday, July 07, 2019

Almost done! And new patterns.

I finally got the collar and collar band attached.  I also inserted the sleeves as well.  Unfortunately, I have not found the right buttons for this tunic.  What's in my stash is too large or not the right color.  I did find some brass snaps that are a dark brown which may work.  I have had pretty good success with my snap on tool and snaps.

I had several issues sewing this tunic, more operator than pattern issue.  Nonetheless, if I go the snap route I hope there is no screw-up.

Here is a shot of the tunic front that is completed. I will be closing this with left over right.
The left front band will be on top as the brown small designs look nicer than the right front band. It will also tie in with the right front design layout.

I recently broke down and purchased a couple new patterns.

This is OOP and found on eBay. 

Mimi G 8750

Mimi G 8889
I fell in love with Nakisha's NL 6314 top on her blog.   I have seen a few tops of this particular view.  I have some knits that I think will work well for this top. The top on MimiG 8750 also got my attention from Vanessa's blog, it's the gray one.  I don't need long sleeves and considering if I make it soon, I will try shorter sleeve length.

I have seen several reviews of the top for S8889.  I have some fabric recently purchased at a sale for $1.00 a yard, I bought the bolt and it cost me $4.00. I plan to make that in the near future.

That's it for now!


Tuesday, July 02, 2019

Still here, some sewing

It has been almost a month since I last posted.  I have been sewing on the same tunic top in bits of time.  I had some issues with some of the steps in the sewing of this top.

First, the front bands presented a challenge as the steps prior to attaching them have you hem the tunic before attaching.  I knew then I was not going to like this method as usually for me the front bands end up too short. You have to fiddle with the end of the front bands to sew to a point and then fold in the ends and stitch.  I cut my bands longer than the pattern which gave me more fabric to turn in. I still had to fiddle with the stopping point so everything aligned. I prefer to attach first and then hem everything.

Then there was the collar issue.  I attached using the traditional method which turned out horribly.  I then remembered the tutorial on Closet Case Patterns for attaching the collar band and collar differently. Here is a link to that method. This worked beautifully.  Pictures to post will follow soon.

Now I have to insert the sleeves and then make buttonholes and attach buttons.

Will post update soon.

August Sewing Simplicity 7295

 I am not doing well as a blogger. I have been working on this project since July 30. Today, I finally finished it. It has been a stop-and-g...