Saturday, February 23, 2019

Black and cream hoodie (photo heavy)

The weather today was much cooler and perfect for me to wear my new hoodie from Ellie and Mac.  The weather has been very strange for the past couple of weeks; thankfully we are not getting the snow and ice.  One day it is 70 degrees and then we drop to 40-50 with lows some nights in the 30's.

I set up the tripod to take some photos before I ventured out into overcast and misty weather.  I am so happy with the outcome of this project and as I write this I have returned from shopping and the top meant the wearability test. So without further ado:


Here are photos of the front:


No photo shot should go without the hands in a pocket view:


Here is the back both wearing and hanging

and here are some views from the side


Here are a few close-ups of the drawstring and the cuffs.  I chose sections of the fabric for the cuffs to match up with each side of the overlay fabric.


I have purchased several Ellie and Mac patterns as I like the numerous styles offered and the prices are very reasonable.  I truly appreciate that because I am printing the pattern using my paper and ink, so it seems a fair bargain.  This is my first make and will not be my last.  And yes I am an affiliate and this is my first review in that role; my opinions are my own.  Should you have an interest in viewing the patterns and you click on my affiliate link on the left sidebar, then I could receive a commission.

The fabrics used in the making of this hoodie were from my stash and coincidently they were purchased from Fabric Mart at different times.  The cream-colored fabrics were used in a Vogue sweatshirt pattern a few years ago. The black and cream fabric was a border print that I purchased to make a dress which never happened.  It worked perfectly for this pattern.

I don't think I need another hoodie at this time and when I do I plan to use this one again.

Friday, February 22, 2019

Drawstrings

From reading my recent posts, you are aware that I have been sewing the Undercover Hoodie.  I decided to not add the waistband but instead use a drawstring.  I searched online and Amazon popped up with sources.  There were several options but I chose this one. They are 47 inches long which worked well for where the hoodie bottom falls on my body.


I truly like how they were packaged in a reusable pouch with zip slide at the top.


It also included tools to make insertion easier.


Not only was this useful for my current sewing project and also for replacing some drawstrings in a couple of my pj's.

For full disclosure, I am an Amazon Affiliate and could receive a commission if you used the link on under Amazon Associate.  

For Sale "She Wears the Pants" book

I have just relisted the above book on Ebay.  If interested, here is the link. In great condition and the patterns included are still in factory fold.


Saturday, February 16, 2019

Ellie and Mac Undercover hoodie update


I finally took the time to take some photo shots of the hoodie in its current progress;  it is actually close to being finished. I fell in love with the look of this pattern months ago and my sewing plan was to complete it in January.  With the deadline looming for the Basically Jalie Blog Tour, the Jalie Mimosa pattern took a lot of my time.

This is a new to me pattern line and thus some trial and error with the fit for me. My measurements put me into the Large range.  With my experience with some other independent patterns, I decided to print the medium and large sizes.  I am glad I did as I basically ended up stitching more of a medium size than large.  This happens pretty much with other indies.

I made some adjustments to the pattern

  1. shortened bodice by 1 1/2 inches
  2. swayback adjustment of 1/2 inch
  3. forward shoulder adjustment of 5/8 inch
  4. FBA of 3/4 inch
During the basting and fitting stages, I had to make numerous adjustments some I should have made originally. I should have taken a horizontal tuck in the upper chest and back to raise the underarms.  By not doing this I ended up using 5/8 inch seam allowance for the shoulders instead of the 1/4 inch the pattern instructions call for.  I really did not need the FBA removing 1 inch from the bust down for front and front overlay.  I also reduced the back side seams by 1/2 inch which did put me into the medium size.  I had to reduce the sleeve shoulders by 3/8 inch due to the deeper shoulder seams I took. I also reduced the shoulder width again putting me into the medium/small size.  I have to do this with most patterns whether indie or big 4.

I attached the lined hoodie and sleeves a little earlier and before sewing up side seams, I decided that the length was still too long on my 5'3" frame so I cut off another inch.  I have only to decide whether to use the waistband option or insert drawstring and then sew side seams and complete the bottom portion.

Here is how it is looking now:

Pocket created with a front overlay
Hand fits nicely in the pocket
Lined hoodie


Front and front overlay with piping along the edge
Sleeve attached.


Back view of the attached hoodie

Even with fitting adjustments, I find this pattern to be well drafted and instructions along with illustrations were well written.  The hoodie can be made to be loose or more fitted depending on your preference and fabric.  I wanted mine to be more fitted thus the medium size works well for that.

I have signed up to be an affiliate for Ellie and Mac as I am impressed with her designs and admittedly their prices are very reasonable.  Their no trim pattern printing was so easy to put together. Being an affiliate, should you click on the Ellie and Mac logo under affiliates on my blog, it is possible I could receive a commission.  Just want to be upfront about that.

Hope to show and wear the complete garment soon.  Thanks for stopping by.


Monday, February 11, 2019

Serger Secrets

 I have two of this book called "Serger Secrets."   Here is a link to where I am selling on eBay at a reduced price.  If you are new to using sergers, this is a good source book to use.

More information to follow on Undercover Hoodie, still a WIP.


Sunday, February 10, 2019

January into February plans

I completed one of my three January projects, the Jalie Mimosa top.  I think I have posted enough about this top and I truly love it.  The other two versions will get attention later.

My next project in the works, finally, is the Ellie and Mac Undercover HoodieI printed, taped and traced the bodice front and back for pin fitting.  I made my usual FBA and chose the large size for this project.  I also made swayback and forward shoulder adjustments.

I finally decided on what fabrics I will use.  All are from my stash with two being ones left over from other projects.  The third fabric is a ponte knit I purchased from Fabric Mart in 2017.

It is a border print in black and cream.  The cream color matches the solid and textured cream fabrics being used.  Yesterday I cut out the front and back bodice. The pocket piece for this pattern is really an overlay of one side of the front that will be the black/cream fabric.

This is my first Ellie and Mac pattern and my first time making a hoodie.  Doesn't seem very difficult but there are lots of parts to this pattern.  Once completed I will be making the Fulton Sweater Blazer.

Will post more later.

Friday, February 08, 2019

Basically Jalie Blog Tour Day 3


I was thrilled to be asked to be a part of the Basically Jalie Blog Tour.  My pattern was sponsored by Jalie. This is the Mimosa Top, 3890.  My fabric sponsor was Simply By Ti. My opinions about both are my own.


I was very interested in making this Jalie pattern.  The pattern offers three style versions.  I have seen several RTW tops with flounce sleeves and wanted to make this view. This is a transition top from winter to spring for me. I do plan to make the tie sleeve version soon.

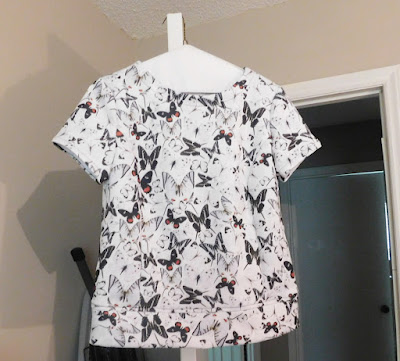
I did not want to make a solid color fabric for this top and after visiting Simply by Ti several times, I decided to use this print fabric with a distinct design and to make the flounces in a solid color for contrast.  The print fabric is a lush feeling rayon knit that is a nice weight, not too light as some other rayon knits I have used.  The cobalt blue fabric is cotton lycra, a little heavier than the print fabric but perfect for the flounces.

When my fabric arrived, it was much prettier than the picture on the website.  The design runs horizontally; after trying to determine how to place the design to be flattering I discovered that the length had the necessary stretch for this pattern.  I decided that I would run the design vertically with the intent of giving the illusion that I am taller and thinner! 😉😉

In recent blogs, I have commented on the need to take new measurements and I still need to do this. As a result, I chose two sizes since this was a pdf pattern and with layering feature, I only printed out the two sizes.  I made my usual adjustments to the pattern, forward shoulder, slight FBA which I did not need in the end, swayback and narrow back adjustment, plus reduced the length by 1 inch and took 1/2 inch horizontal tuck in the upper chest and back.  

I can tell by the look of the tops on the models that this pattern is loose fitting and my chosen sizes made this too loose on me.  So instead of using 1/4 inch seam allowances, I ended up using 5/8 seam allowances.  The bust was extremely too big and ended up taking it in by an inch tapering to 5/8 at the waist.  I think some of the bust fullness was due to the FBA I made and also using the fabric vertically caused too much stretch.  I am hoping that the stretch does not cause this to grow more! I also used a 5/8 inch hem allowance since the side seams were at that width.  

The flounces are gathered and attached prior to inserting the sleeves, great idea.  I normally run two basting stitches and then gather.  With these flounces, I decided to use my gathering foot and this went well.  I tried several samples of stitch length and tension.  The longer stitch and tighter tension worked great.  The flounces edges are to be left raw and is something however I normally do not do.  I did with these and I actually like it.

I tried a new technique for me of attaching the neckline.  I have used another method I found on Threads Insider and normally that has worked well for me.  Of late though I have had some difficulty in getting the neckband to lay flat. Another blogger-Linda Fay with Faye's Sewing Adventure
mentioned in a post or on one of Facebook's sewing related groups about a technique she should use that was included Lynda Maynard's book Dressmaker's Book on Couture Techniques. (I am an Amazon affiliate and should you use the link to acquire this book for your sewing library I could receive a commission.) I immediately purchased this book and used her technique for the neckband for this top. There are some other neckband finishes for woven fabrics and many other design techniques in this book. It is fast becoming one of my go-to sewing books.

Another alteration not mentioned above is that the sleeves are too long for me, not unusual for Jalie as well as other patterns.  I am vertically challenged. Prior to cutting out the sleeves I had reduced the length by 1 inch and ended up taking 3/4 inch hem allowance.  They are still a little long but I like that I can push them up some and they stay.  The sleeve bicep width was a little wide and I took 3/4 inch seam from underarm tapering to 1/2 inch from elbow to sleeve bottom.

I like the high low hemline and that back length covers my bottom well.
I like this top very much.  I like the length with my adjustments, the not to tight nor too loose look as well as the various sleeve options.  I will be making the tie sleeve version for spring/summer.  The instructions for the pattern were very good and the accompanying illustrations were also helpful, particularly if you are a visual learner as I am. Sizing issues were my own and with changing body shape, I need to remeasure certain areas to achieve a better fit prior to cutting out this pattern or any other.  I knew to make this or any other Jalie pattern requires adjustments as they are drafted for a taller person than I am.  There are no "petitable" lines for adjustment so making any may require more sewing experience than a new sewist.  I have made many without those lines and know where they are needed.


The rayon knit fabric washed up well and was not so fiddly as a thinner rayon knit.  I am glad that I tried this on the vertical.

Here are a few more photos of me wearing the top:

Don't forget to check out the giveaways from our sponsors and also make note that if you participate in the sew-along you have a chance to win some prizes. See below.  Also please check out our other Basically Jalie Blog Tour bloggers ( all information noted below).
50661398_10161468105145720_3271995112174911488_o
Are there some Jalie patterns you've been itching to sew? Now's your chance to WIN YOUR JALIE WISHLIST! Head over to Jalie's website, create an account, add your favorite patterns to your wishlist, and complete the rafflecopter form below (patterns must be added by February 12, 2019 11:59pm EST to be eligible). Incomplete entries will be eligible for fabric prizes only.

For extra entries, join our Jalie sewalong! Make a Jalie "basic" between now and February 12 and share it on Instagram with hashtag #basicallyjalie and/or in the Basically Jalie Album in the Sewing with Jalie Facebook group.

We are so grateful to our generous sponsors who have teamed up to provide the following prizes (please stop by their shops and show them some love!):

Grand Prize (Worldwide)
Win Your Jalie Wishlist - Up to $100 CAD in patterns!
Discovery Trekking Outfitters - One (1) x 50 USD gift card
D&H Fabrics co. - One (1) x $50 USD gift card

Sewalong Prize (Continental USA only)
Win Your Jalie Wishlist - Up to $25 CAD in patterns!
The Sewciety - One (1) Subscription box (value: $48 USD)
Simply By Ti - One (1) x $20 USD gift card

Sewalong Prize (Worldwide, excluding Continental USA)
Win Your Jalie Wishlist - Up to $25 CAD in patterns!
PatternReview.com - One (1) x $30 USD gift card
Discovery Trekking Outfitters - One (1) x 50 USD gift card
(Note: gift cards exclude shipping unless otherwise stated on sponsor website)


Blogger Lineup


Be sure to visit these talented sewing bloggers during the tour:

Wednesday, February 06, 2019

Basically Jalie Giveaway


Basically Jalie Blog Tour begins today. Please read below the great giveaways from our sponsors.

GIVEAWAY!

50661398_10161468105145720_3271995112174911488_o
Are there some Jalie patterns you've been itching to sew? Now's your chance to WIN YOUR JALIE WISHLIST! Head over to Jalie's website, create an account, add your favorite patterns to your wishlist, and complete the rafflecopter form below (patterns must be added by February 12, 2019 11:59pm EST to be eligible). Incomplete entries will be eligible for fabric prizes only.


For extra entries, join our Jalie sewalong! Make a Jalie "basic" between now and February 12 and share it on Instagram with hashtag #basicallyjalie and/or in the Basically Jalie Album in the Sewing with Jalie Facebook group.


We are so grateful to our generous sponsors who have teamed up to provide the following prizes (please stop by their shops and show them some love!):

Grand Prize (Worldwide)
Win Your Jalie Wishlist - Up to $100 CAD in patterns!
Discovery Trekking Outfitters - One (1) x 50 USD gift card
D&H Fabrics co. - One (1) x $50 USD gift card

Sewalong Prize (Continental USA only)
Win Your Jalie Wishlist - Up to $25 CAD in patterns!
The Sewciety - One (1) Subscription box (value: $48 USD)
Simply By Ti - One (1) x $20 USD gift card

Sewalong Prize (Worldwide, excluding Continental USA)
Win Your Jalie Wishlist - Up to $25 CAD in patterns!
PatternReview.com - One (1) x $30 USD gift card
Discovery Trekking Outfitters - One (1) x 50 USD gift card
(Note: gift cards exclude shipping unless otherwise stated on sponsor website)


Blogger Lineup


Be sure to visit these talented sewing bloggers during the tour:


August Sewing Simplicity 7295

 I am not doing well as a blogger. I have been working on this project since July 30. Today, I finally finished it. It has been a stop-and-g...